Täglicher Bestellschluss um 14:00 Uhr

Shadow Foam X Moorlander EDC = größter Einsatz aller Zeiten!
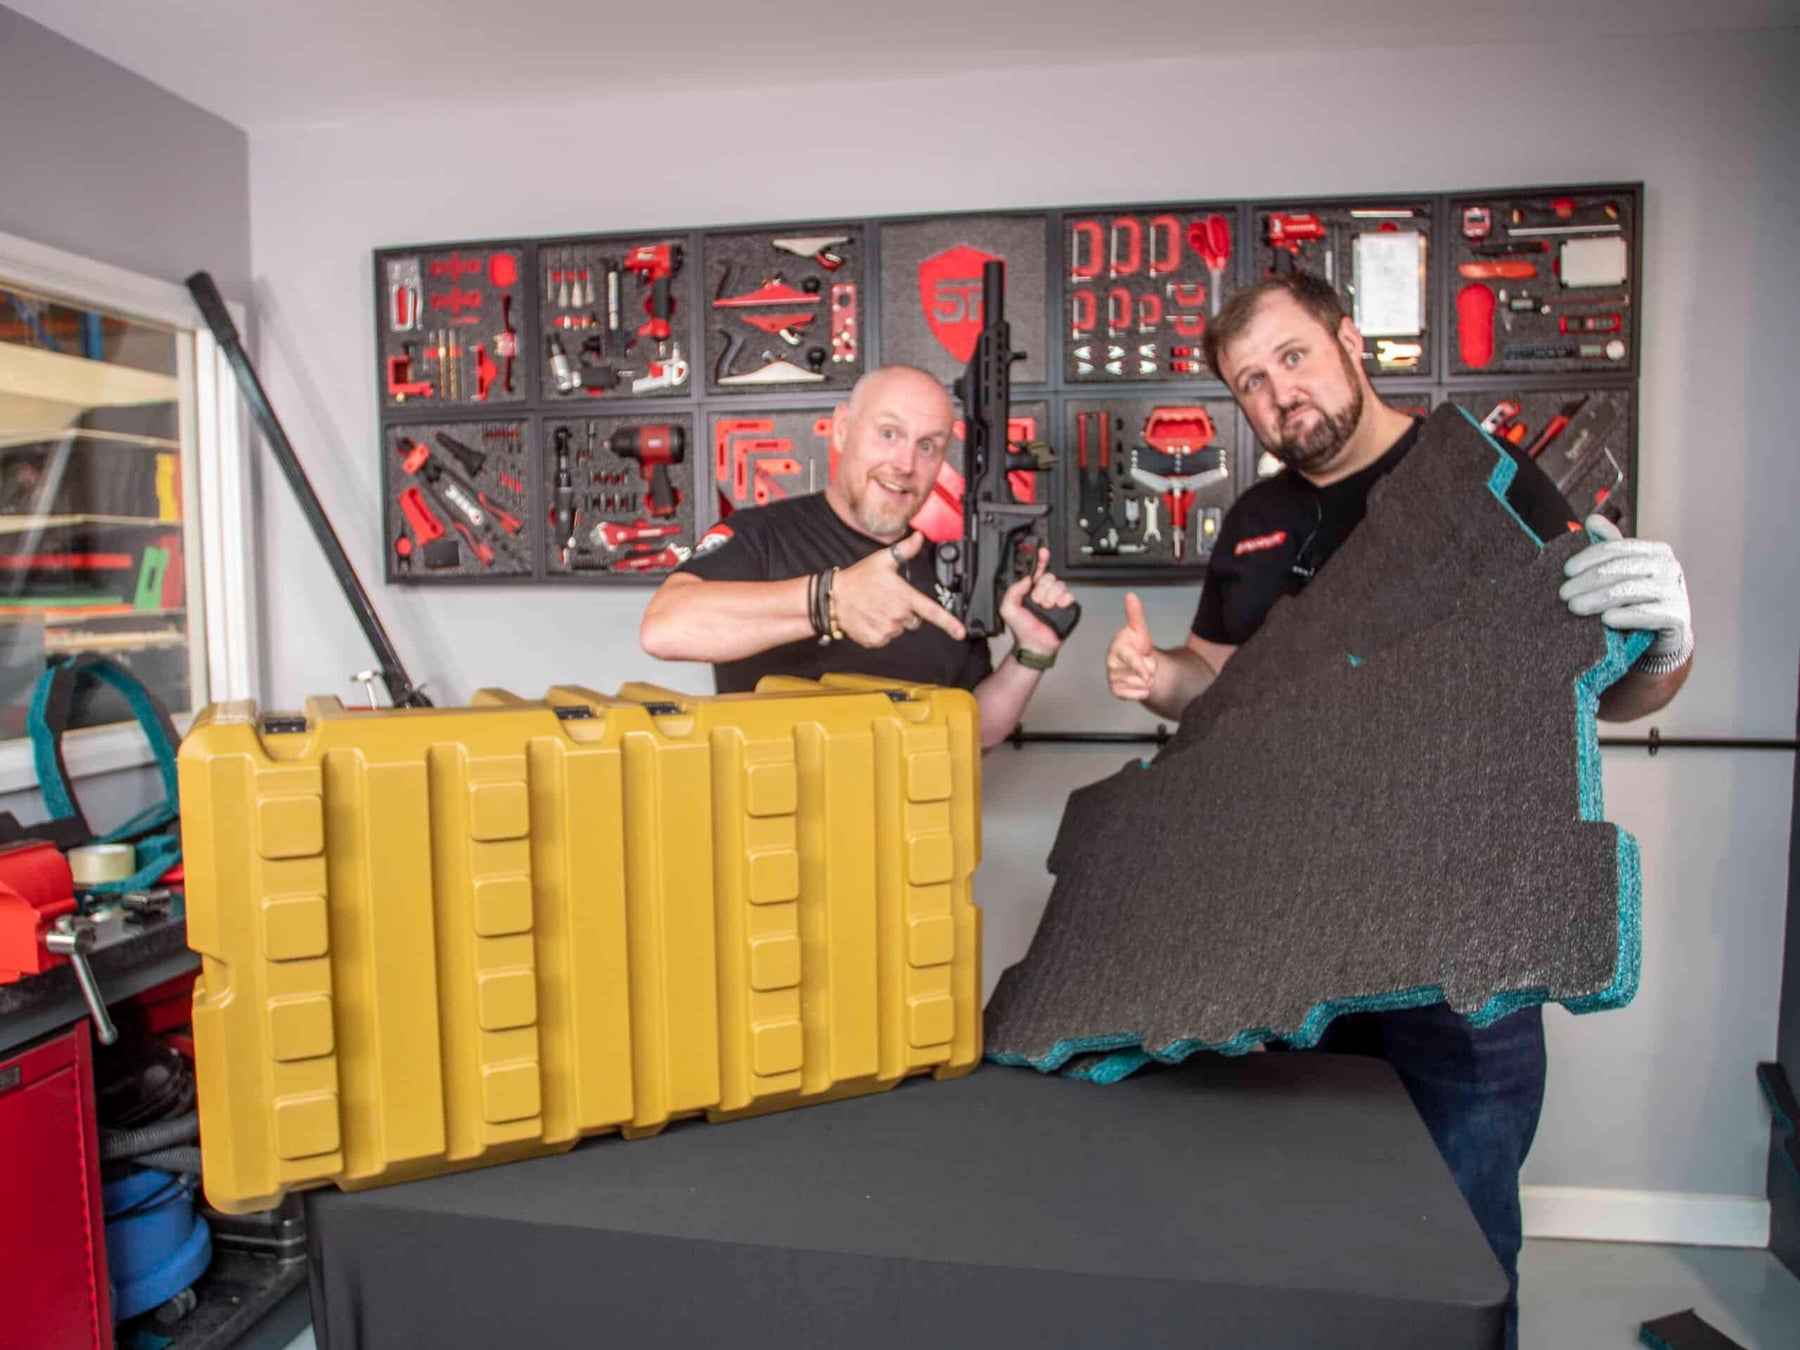
Es ist immer großartig, eines unserer affiliates in der Fleisch. Also als Randy von Moorlander EDC Das Vereinigte Königreich wollte uns einen Besuch abstatten, und wir waren sehr aufgeregt. Was wir jedoch nicht erwartet hatten, war die Größe des Projekts, das er angehen wollte! Er hatte sich eine Suprobox geschnappt – weithin als eine der härtesten angesehen, am robustesten Fall, den Sie bekommen können. AKA die große Bestien-Kriegskiste, wie Jonathan sie nannte. Dies war nie ein einfaches Projekt. Aber mit dem EDC-Meister und Mr. Shadow Foam an der Sache, würde es immer Spaß machen. Also, hier ist, was passierte, als EDC UK auf Shadow Foam traf. Und wir haben unseren bisher größten Schaumstoffeinsatz geschaffen, der ein Airsoft Waffenetui für Randy.
Über Moorlander EDC uk
Randy, besser bekannt als Moorlander EDC, kam erstmals mit EDC in Berührung (Every Day Carry) vor einiger Zeit. Er sagte, er habe immer Dinge in seinen Taschen, um den Tag zu überstehen. Befürworter von EDC tragen gerne Gegenstände bei sich, die helfen, die Herausforderungen des Lebens direkt anzugehen. Taschen wurden dann zu einer großen Faszination für Moorlander, und der Rest der Every Day Carry Sachen folgte von dort. Er begann dann, Inhalte für andere EDC-Fans zu erstellen. Jetzt hat er einen florierenden Youtube-Kanal. EDC UK Suprobox Airsoft-Waffenetui Kriegsbox
Über Suprobox
Suprobox sind in der Türkei hergestellte Schutz- und Aufbewahrungsboxen. Moorlander stieß erstmals auf sie bei der IWA 2022 Zeigen in Nürnberg. Ihre Koffer werden jetzt weltweit unter der Marke SUPROBOX® verkauft, während sie lokal in der Türkei als KORALTAY® bekannt sind. Sie haben das Multıbrix® Stapelsystem entwickelt. Dies ist ein patentiertes Stapelsystem, das das gerade oder kreuzweise Stapeln von Koffern gleicher oder unterschiedlicher Größe ermöglicht.
Jetzt mit Verkaufsbüros sowohl in Großbritannien als auch in Polen erwarten wir, dass wir viel mehr von diesen Koffern auf dem britischen Markt sehen werden. Besonders angesichts ihrer Größe, Robustheit und der breiten Palette von 194 verschiedenen Größenoptionen. Und genau wie Shadow Foam kommen ihre Koffer auch in 7 verschiedenen Colour-Optionen... möglicherweise eine perfekte Kombination.
Dieses Projekt
Moorlanders Suprobox war in Senf Yellow. Also entschied er, dass die Verwendung unseres Teal Colour Schaums einen schönen, komplementären Kontrast bieten würde. Aber mit der 3D-Formung und den Rädern am Boden sowie den Rillen an der Seite des Gehäuses war dies nie ganz einfach. EDC UK Suprobox Airsoft-Waffenetui Kriegsbox

Es gibt zwei Techniken, die wir typischerweise verwenden würden, um maßgeschneiderte Einsätze für Fälle wie diesen zu erstellen. Zusammenfassend:
1. Die Salz-Methode – das hilft uns, die Form zu digitalisieren. Indem wir Salz in die Basis des Objekts gießen, für das wir den Einsatz herstellen möchten, verwandeln wir den 3D-Raum im Wesentlichen in ein 2D-Bild. Wir können dies dann skalieren und digitalisieren, um das äußere Profil des Einsatzes zu erstellen. Für viele ist dies jedoch nicht unbedingt der einfachste Prozess. Daher ist es nicht das, was wir für dieses Projekt tun werden. EDC UK Suprobox Airsoft-Waffenetui Kriegsbox

2. Die Papiermethode. Wir haben dies bereits zuvor demonstriert, als wir ein Insert für ein Bosch Hülle. Auf den ersten Blick wirkt es etwas klobig und ein bisschen „Blue Peter“. Für uns geht es bei Shadow Foam jedoch immer darum, professionell zu arbeiten Werkzeugkontrolle für jeden zugänglich. Und so ist diese Einfachheit und Zugänglichkeit wahr für alles, was wir tun. Daher entwickeln wir eine Methode, mit der jeder eine maßgeschneiderte Einlage für jeden Fall erstellen kann. Einfach mit Materialien, die Sie zu Hause herumliegen haben. Trotz des Umfangs dieses Projekts haben wir uns entschieden, genau das hier zu tun.
Alles, was Sie dafür benötigen, ist:
- Papier
- Scheren
- Klebeband
- Stift
- (optional, aber es ist eine große Hilfe) ein Shadow Foam contour gauge.
Nehmen Sie eine Uhr von der vollständig hier machen für den Ablauf der Erstellung der Vorlage. Oder besuchen Sie das Bosch-Projekt, das wir erwähnt haben, um zu sehen, wie es in kleinerem Maßstab gemacht wird. EDC UK Suprobox Airsoft-Waffenetui Kriegsbox
Erstellen des Schaumstoffeinsatzes aus der Vorlage
Wann immer Sie mit Shadow Foam arbeiten, empfehlen wir Ihnen, auf unsere Leitfaden zum ShadowFoaming und einige der Links und Ressourcen, auf die Sie hier verwiesen werden. Dies wird Ihnen helfen, die Entscheidung zu treffen, welche Schaumdichte Sie benötigen. Es wird auch beraten, die Werkzeuge und Techniken, die Sie benötigen, um die besten Ergebnisse zu erzielen. Es lohnt sich immer, die „Wie man” Abschnitt unserer Website ebenfalls. Nur um sich mit den besten Arbeitsweisen vertraut zu machen, bevor Sie beginnen.
Für uns hat Jonathan bereits geplant, dass die beste Schaumtiefe, die hier in der Basis verwendet werden kann, 50 mm darunter und eine 30 mm Schicht oben beträgt. Also bewaffnet mit unserem zuverlässigen Schneidekit Zusammen mit der Papiervorlage, die wir gerade erstellt haben, sind wir bereit loszulegen.
Genau auf die gleiche Weise, wie wir Werkzeuge oder Gegenstände in den Schaum schneiden würden, beginnen wir mit einem Konturschnitt. Halten Sie das Skalpell einfach wie einen Bleistift und schneiden Sie leicht um die Papiervorlage. Sobald Sie den Konturschnitt haben und sicherstellen, dass Sie Schnittschutz-Handschuhe tragen, können Sie den Schaum anheben und wieder in den Schnitt gehen. Zuerst tiefer schneiden und dann ganz durch. Offensichtlich haben wir dies zweimal gemacht – einmal für die Basisschicht und einmal für die Oberseite.
Um den Einsatz anzupassen, müssen Sie mit etwas mehr Anpassung rechnen. Für uns mussten wir einen Radius an der Unterkante des Einsatzes hinzufügen, um die Form des Bodens des Gehäuses widerzuspiegeln. Wir haben auch einige Ausschnitte in die Radmulden der unteren Schicht gemacht, was wir dann bei der 30-mm-Oberfläche nicht mehr tun mussten, da diese ordentlich oben auflag. Dann einfach anpassen, und Sie sind bereit, mit dem Einpassen Ihrer Artikel zu beginnen!

Anpassung der Airsoft-Waffe.
Die Waffe des Moorlanders war die Scorpion Evo aus CZ. Jonathan schlug vor, die 30-mm-Deckschicht vollständig zu durchschneiden, um dies unterzubringen. Viele Airsoft-Spieler verwenden Nuprol-Koffer für die Aufbewahrung ihrer Waffen, und wir haben eine Auswahl an fertige Einsätze Um diese anzupassen. Die Tiefe beträgt an der Basis ebenfalls 50 mm und oben 30 mm. Wir wissen also, dass dies eine Kombination ist, die funktioniert. Und das Paar entschied, dass, wenn die Waffe selbst in der Mitte nahe der Oberseite abgeschnitten würde, dies Randy Platz darunter lassen würde. In den er dann seine Magazine und Batterien schneiden könnte, sobald er nach Hause kam.
Eine wichtige Empfehlung von Jonathan hier war, die Waffe selbst beim Schneiden zu schützen. Da sie mit einer Pulverbeschichtung versehen war, bestand die Möglichkeit, dass der Metall-Skalpellgriff sie zerkratzen oder beschädigen könnte. Aber indem man ein kleines Stück Klebeband auf den Skalpellgriff klebt, wird dies verhindert.
Überprüfen Sie immer unsere „Wie man schneidet“-Richtlinien, bevor Sie ein Projekt angehen. Im Wesentlichen entfernen wir, nachdem wir die Kontur des Artikels nachgezeichnet haben, diese und schneiden dann tiefer. Wir möchten tatsächlich bis ganz durch unser 30 mm dickes Blatt schneiden. Wenn Sie ein Schneidematte Dann sollte das einfach genug sein. Aber wenn nicht, und Sie möchten nichts beschädigen, was darunter ist, dann können Sie es wie wir einfach über eine klare Kante halten und gerade durchschneiden.
Nachdem wir das getan hatten, bewerteten wir die Positionierung der Waffe im Einsatz und stellten fest, dass sie idealerweise um zusätzliche 10 mm weiter in die Basis der Schaumstoffschicht abgesenkt werden könnte. Dies wird uns auch den Teal-Kontrast in der Enthüllung geben, wenn die Waffe nicht an Ort und Stelle ist, den wir sonst nicht gehabt hätten. Dann, wieder zu Hause damit, fügte Moorlander die Magazine hinzu, et voila!

Zukunftssicherung
Moorlander EDC UK hat mit diesem Design clever vorausschauend gedacht. Schließlich möchte man nicht jedes Mal den gleichen Prozess und die gleichen Kosten durchlaufen, wenn man neue Ausrüstung kauft. Indem er seine Magazine auf eine Seite positioniert hat, hat er Platz daneben gelassen. In diesen kann er später mehr hinzufügen, wenn er sie bekommt. Das ist immer eine wirklich gute Idee, wenn man seine Ausrüstung organisiert, um das Wachstum seiner Sammlungen in der Zukunft zu ermöglichen.
Aber dann, Moorlander wie er ist und auf alles vorbereitet, ist das noch nicht das Ende der Geschichte! Mit dem Koffer kamen zwei separate herausziehbare Tabletts. Diese hatten ebenfalls eine wirklich gute Größe und waren offensichtlich so robust wie der Rest des Koffers. Also mussten auch diese gut genutzt werden. Wenn die Kriegskasse für all Randys Airsoft-Ausrüstung verwendet werden sollte, machte es Sinn, diese so einzurichten, dass auch seine Pistolen darin aufbewahrt werden konnten. So wäre im wahrsten Sinne des Wortes im EDC UK-Stil alles an einem Ort, wenn man es brauchte.
Wie bei der Basis und der größeren Waffe entschied er sich erneut für eine doppelte Schicht. Diesmal mit einer 30-mm-Schicht in der Basis und der gleichen Schicht oben, da das Fach etwas flacher war. Er wählte erneut die Teal Colour, und diesmal hatte er den zusätzlichen Vorteil, das herausziehbare Fach als Vorlage zu verwenden, um seinen Einsatz zu erstellen. Obwohl er, wie er lernte, immer noch einiges an Anpassungen vornehmen musste, um es perfekt anzupassen. Geduld ist hier der Schlüssel, nehmen Sie sich Zeit, um die besten Ergebnisse zu erzielen!
Natürlich, nachdem er den ersten Schaumstoffeinsatz erstellt hatte und dieser perfekt passte, war es so einfach, ihn als Vorlage für den zweiten zu verwenden. Dann schnitt er auf genau die gleiche Weise wie bei der größeren Waffe die Pistole und Magazine ein und passte sie dann in den Koffer.


 Kostenloses Schneideset bei qualifizierten Bestellungen
 Über 4.000 positive Bewertungen
 Mehr als 500 Videos auf YouTube
 Unterstützung in Großbritannien