Clôture quotidienne des commandes à 14h
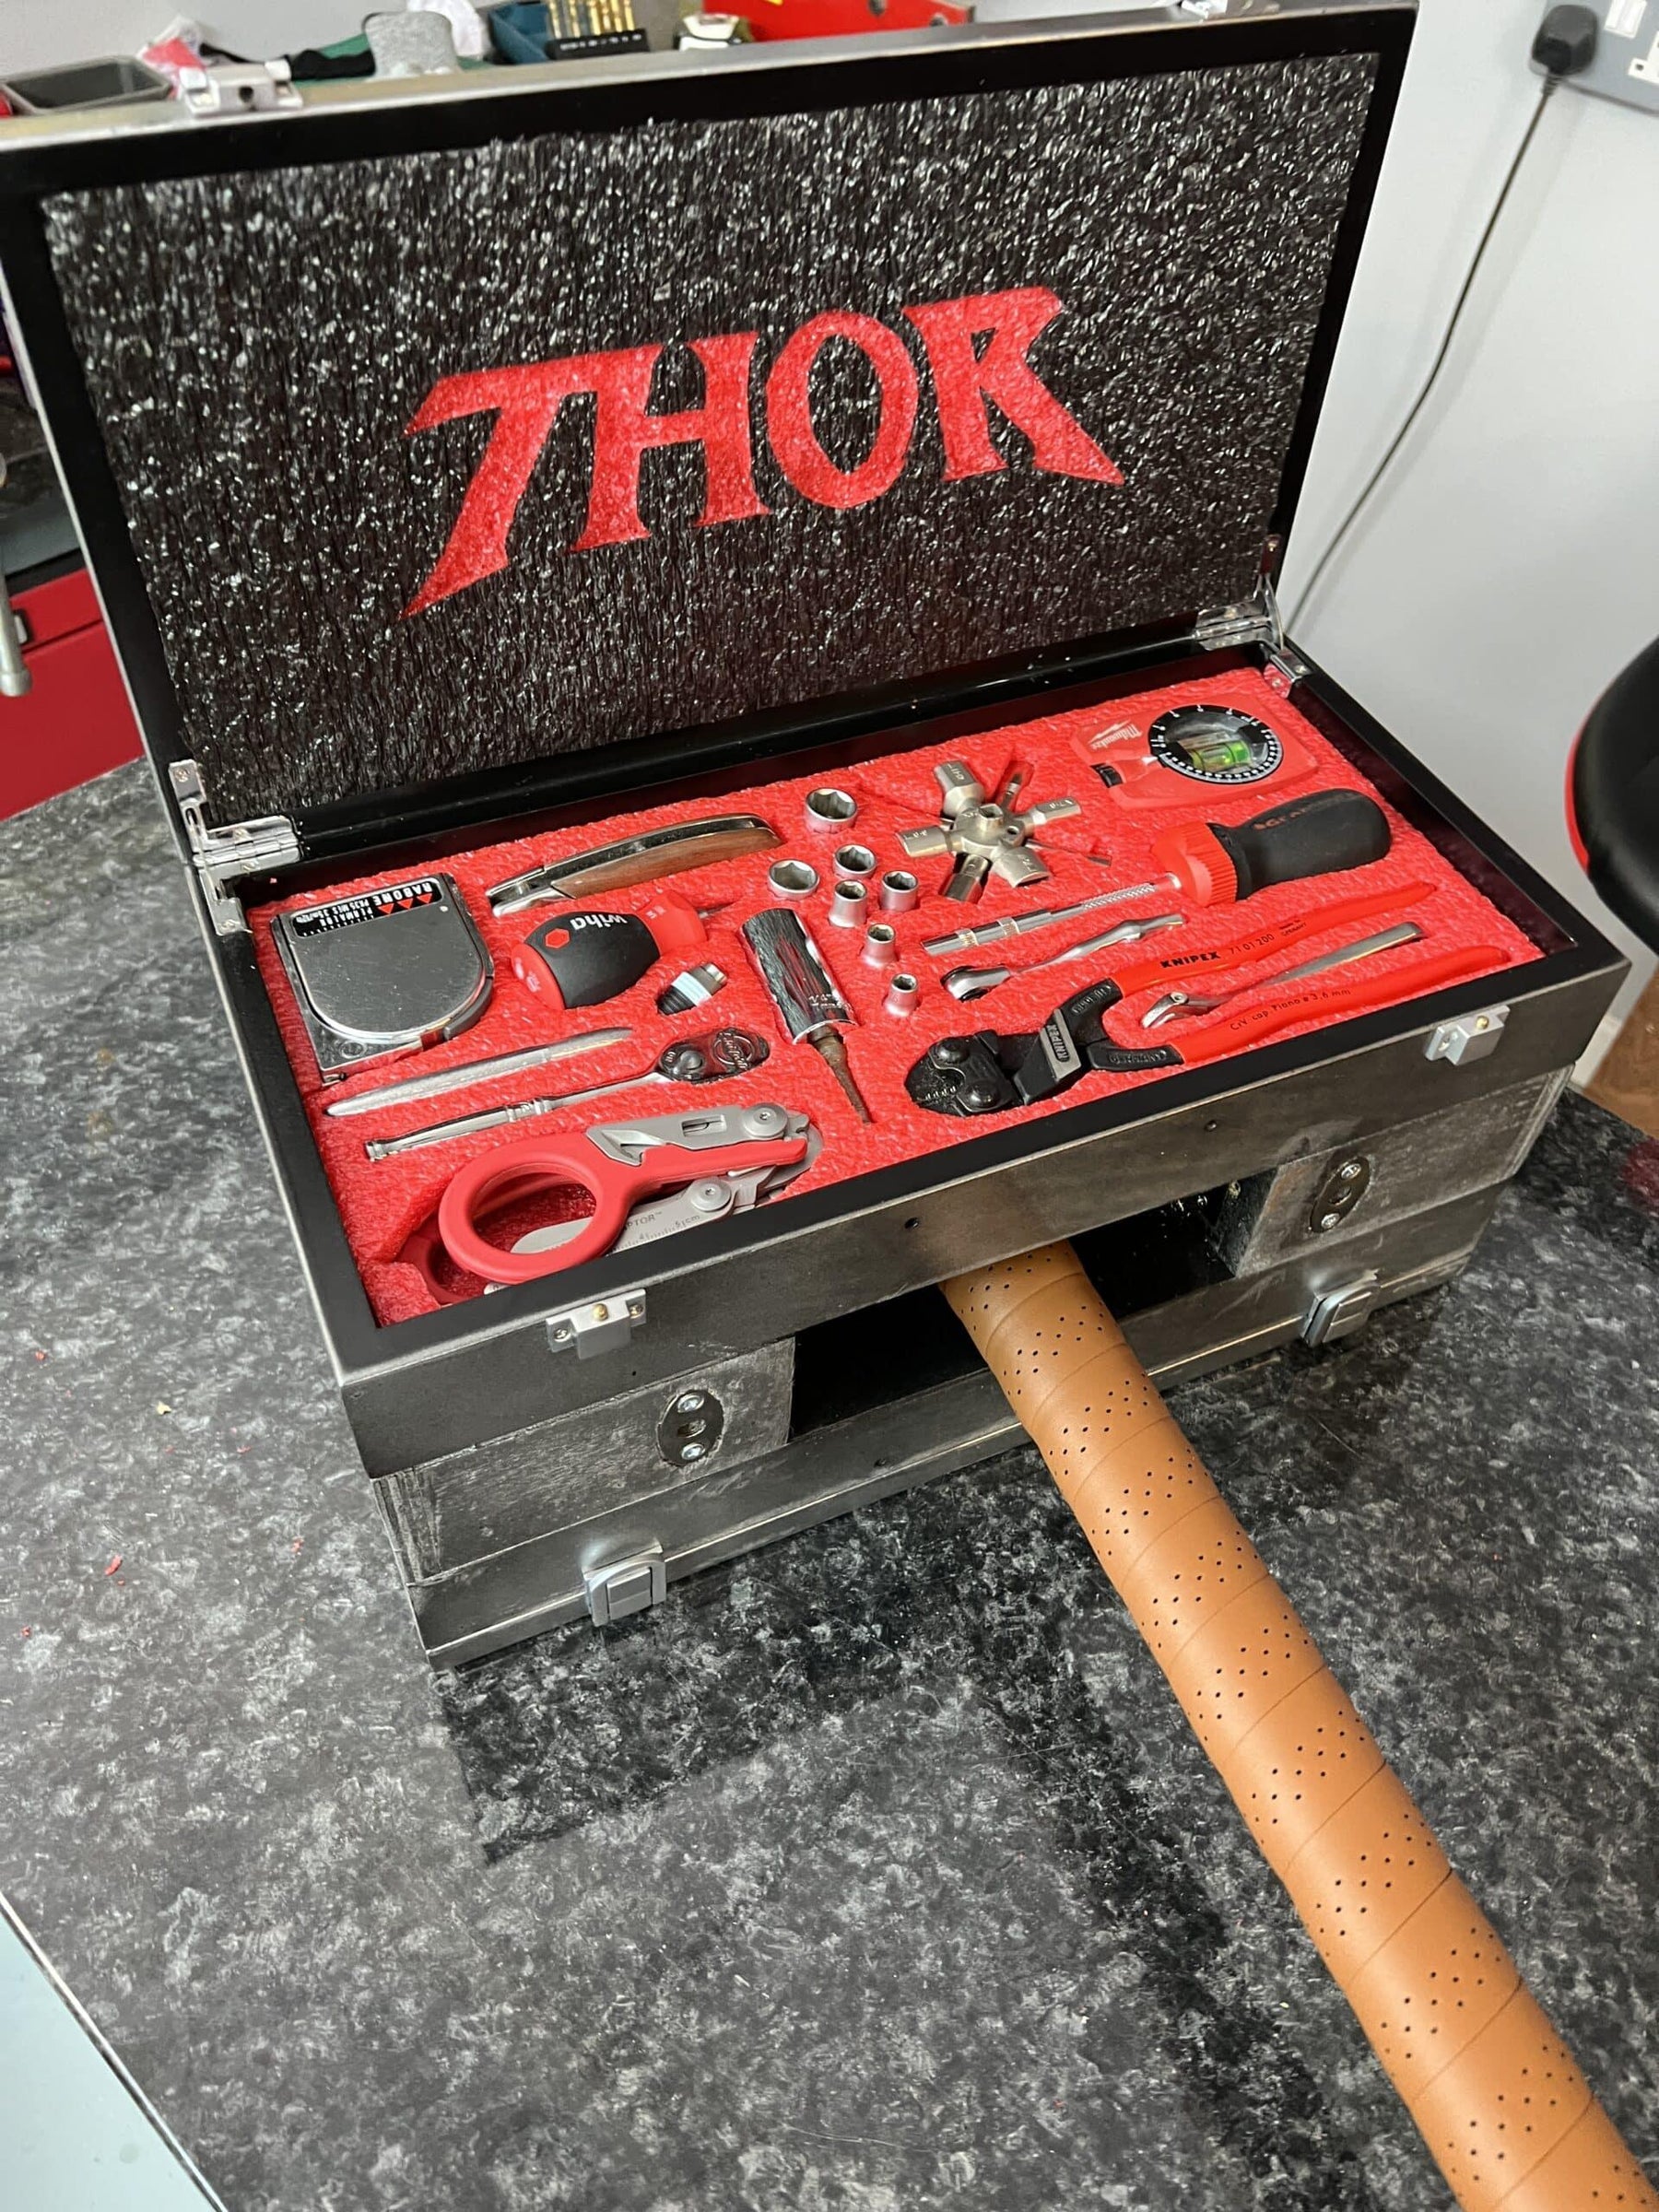
Construction d'une boîte à outils Marteau de Thor
Avec la soutie imminente de Marvel‘s dernière sortie, Thor: Love et Thunder, et ayant été un peu déçu par une boîte à outils en forme de marteau de Thor que Jonathan a récemment achetée sur Amazon, il n'y avait qu'une seule chose à faire. Un autre projet original de Shadow Foam pour fabriquer nous-mêmes une boîte à outils en forme de marteau de Thor plus grande et meilleure !
Qu'est-ce que le marteau de Thor ?
Dans la mythologie nordique, le nom de Thor signifie "Tonnerre" et il était considéré comme le dieu de la tempête. Ainsi, le tonnerre était perçu comme étant le son de son marteau s'abattant sur ses ennemis. Il est donc intéressant que l'ancien nom nordique de son marteau soit Mjöllnir, qui est censé signifier "éclaircissement"
Dans le Univers cinématographique Marvel bien que, le nom devient “Mjolnir. Il est généralement représenté comme un grand marteau gris à tête carrée, avec un manche court et rond enveloppé de cuir Brown. Comme on pourrait s'y attendre, c'est une arme enchantée et magique avec de nombreux pouvoirs et capacités.
Cependant, jamais dans ses rêves les plus fous, Thor n'aurait imaginé que son marteau pourrait contenir tous les outils dont il pourrait avoir besoin ! Ainsi, voici les débuts de notre plan.
La première version de la boîte à outils du marteau de Thor
…était très décevant pour le dire légèrement ! Plus ennuyeux que Thor. Vous pouvez les trouver sur Amazon pour n'importe où entre environ 40 £ et 100,00 £ et il peut y avoir quelques différences subtiles entre ceux qui existent. Mais celui que nous avons reçu, bien que la boîte elle-même était plutôt cool, contenait en fait des outils assez médiocres.

Nous avons vraiment aimé l'idée de ce boîtier. C'est un boîtier en plastique soufflé qui se déclipse sur les côtés et se déplie. Ensuite, le manche du marteau est en fait… un marteau ! Génial, non ? Eh bien, cela aurait été le cas si le reste du boîtier avait été à la hauteur de ce bon départ. Mais il n'y avait qu'une petite sélection d'outils à l'intérieur, dont le choix était un peu décevant à notre avis. Bien qu'il y ait un petit ouvre-bouteille en forme de marteau de Thor qui nous a beaucoup plu. Mais malgré tout, cela nous a servi de grande inspiration pour construire quelque chose de mieux.
Amélioration de la boîte à outils du marteau de Thor
Nous avons visité pas mal de magasins d'antiquités pour trouver exactement ce que nous voulions pour créer la base de notre boîte. À la fin, nous sommes tombés sur quelques étuis à bijoux vintage assortis que nous avons achetés pour 7,50 £ chacun. Tout ce que nous devions faire était de retirer les plateaux en velours et, une fois placés ensemble, ceux-ci nous ont donné le début d'un très joli conteneur en forme de marteau.
Alors, qu'est-ce qui allait y aller...? Eh bien, souviens-toi de ça étui à outils compact projet que nous avons réalisé il y a quelque temps ? Eh bien, cela va être la base sur laquelle nous allons travailler. Il contenait tout ce dont nous avions besoin pour ce cas (à l'exception d'un marteau), donc avec juste un ou deux changements potentiels, c'est ce que nous allons utiliser.
Ensuite, et très important bien sûr, nous avions besoin d'un marteau. Maintenant, un marteau à griffes n'allait pas fonctionner pour cela car nous augmentions l'échelle du projet par rapport à l'original. Nous avons donc fini avec un marteau de démolition. Le plus petit que nous pouvions obtenir chez B&Q pesait 3 kg. Bien que le manche soit légèrement plus long que ce que nous voudrions finalement, le reste des proportions était presque parfait.

Fabriquer la tête du marteau
Nous avions quelques morceaux de MDF de 18 mm qui traînaient, ainsi qu'un morceau de panneau de particules de 22 mm. Et c'est ce que nous allions utiliser comme base pour fabriquer la partie centrale "support de marteau" de la boîte. Essentiellement, la section du milieu qui se trouverait entre les deux côtés de la boîte à outils.
Nous avons décapé les deux boîtes que nous avons obtenues du centre antique et retiré leurs poignées ornées. Ensuite, nous avons mesuré et découpé les deux pièces en MDF et une en aggloméré. Nous avons également découpé un trou au milieu en haut juste assez grand pour la tête du marteau. Nous avons fait ces pièces 12 mm trop petites tout autour pour nous assurer de pouvoir les encadrer proprement pour une belle finition plate. Pour cela, nous allions fabriquer une bande en contreplaqué de 12 mm pour un bord lisse.
Nous avons pris les trois couches et les avons ensuite collées et clouées ensemble. Puis nous leur avons donné un léger ponçage pour obtenir un bord lisse auquel la bande de contreplaqué peut se fixer.
La mécanique de cela
Il s'est avéré que le mécanisme que nous avions prévu pour verrouiller le marteau en place (boulons à encastrer B&Q) n'allait tout simplement pas convenir. Nous allions avoir besoin de quelque chose d'un peu plus robuste. Donc, un voyage dans notre caverne d'Ali Baba locale, Whiteshaws Bricolage à Northwich était en ordre. C'est le genre d'endroit où vous pouvez littéralement trouver n'importe quoi. Et en effet, nous sommes repartis avec exactement ce dont nous avions besoin (plus beaucoup plus !)

Following our shopping trip, with a couple of cans of silver spray paint, and some matt black spray for some dry brushing that was the paint job in hand. The bigger job of locking the hammer head into place was also on the way to being solved too. We opted for some security door bolts which lock and unlock with a generic star key. When twisted the key turns and locks the dead-bolt into place.
Notre plan initial de percer le centre de la face en acier durci du marteau ne s'est pas tout à fait réalisé. Donc, à la fin, nous avons fini par abaisser la position assise du marteau dans la boîte de jeu afin que les verrous puissent être installés au-dessus. C'était un compromis, mais cela a quand même très bien fonctionné.
Ajout de quelques détails
Avec tout maintenant en ordre, il est temps d'ajouter quelques détails !
Le travail de peinture
First up, a couple of layers of the silver spray paint on the box. Once dry we added a dust coating of the matt black. This gave it a really great rustic patina and tha authentic, aged effect we were after. With that all done and dry we can then add back the hardware (catches etc).
Finition du marteau-piqueur
Ensuite, nous avons fait couper le manche du marteau à la bonne taille. D'un point de vue échelle, nous avons décidé que 66 cm fonctionnerait parfaitement pour nous, donc il a été scié à ce point. Pour décorer, nous avons utilisé un bon vieux revêtement de guidon de vélo en simili cuir. Cela nous a aidés à reproduire efficacement l'effet du marteau de Thor, cela a également rendu la prise très agréable, ce qui était super. Surtout compte tenu du poids qu'il a fini par avoir !
Les inserts en mousse
Comme toujours, nous avons opté pour notre combinaison habituelle de Red et Black. Cependant, dans un léger changement par rapport à la normale, nous retournons une feuille. Ainsi, le dessus où nous mettrons un logo sera Red sur Black. Mais ensuite, la base où vont les outils sera Red côté visible pour un impact réel. Nous avons fait couper nos feuilles à la taille pour s'adapter à la boîte. Vous pouvez le faire aussi en utilisant notre Taille personnalisée service de mousse. Ou, il suffit de couper quelque chose à la taille de notre packs de valeur or feuilles moyennes, peu importe ce qui vous convient le mieux. La mousse de 30 mm s'adapte parfaitement à la base pour les outils.
Vous pourriez remarquer que les couvercles sont assez peu profonds, et nous avions besoin d'une mousse de 10 mm de profondeur. La profondeur la plus faible que nous vendons est de 30 mm. Mais cela a été assez facile à réaliser en prenant simplement une feuille de 30 mm et en coupant / pelant à la main pour enlever 20 mm de profondeur par l'arrière.
Outils de coupe
Nous avons pris notre original étui à outils compact et avons marqué tous les outils de celui-ci que nous voulions vraiment inclure dans cette construction. Cela comprenait nos ciseaux Leatherman raptor, un ensemble de mini tournevis et des lames. Et en gros, autant de contenu original que nous pouvions intégrer. Mais nous avons dû perdre quelques pièces en cours de route.
Comme toujours, nous prévu la disposition avant coupe and pelage la mousse pour ranger chaque outil. Pour plus d'informations sur la façon dont cela est fait, regardez l'une de nos Vidéos YouTube.

Découper les logos dans les couvercles
Comme vous le verrez dans le vidéo de la fabrication, tout ce que nous devions faire pour obtenir un logo vraiment professionnel sur chacun des couvercles était d'imprimer les logos à la taille souhaitée. Ensuite, nous traçons les lignes sur l'impression dans la mousse. Une fois la mousse retirée, il y avait nos logos ! Cela peut devenir délicat si vous avez un espace ou des lettres plus petites. Mais dans l'ensemble, cela vaut vraiment le temps et les efforts pour personnaliser ou personnaliser brillamment tout ce que vous avez créé.
Et le résultat du Marteau de Thor ?
Eh bien, nous en sommes contents, mais nous aimerions aussi savoir ce que vous en pensez. C'est une véritable amélioration par rapport au Marteau de Thor d'Amazon que nous avons reçu. Pesant un lourd 9,26 kg à vide ou 12,6 kg avec tous les outils à l'intérieur, c'est un Marteau de Guerre dont n'importe quel héros Marvel serait fier de se servir !














 Kit de découpe gratuit sur les commandes qualifiées
 Plus de 3 000 avis positifs
 Plus de 500 vidéos sur YouTube
 Soutien basé au Royaume-Uni