order before 2pm

Comment fabriquer un établi avec un budget limité
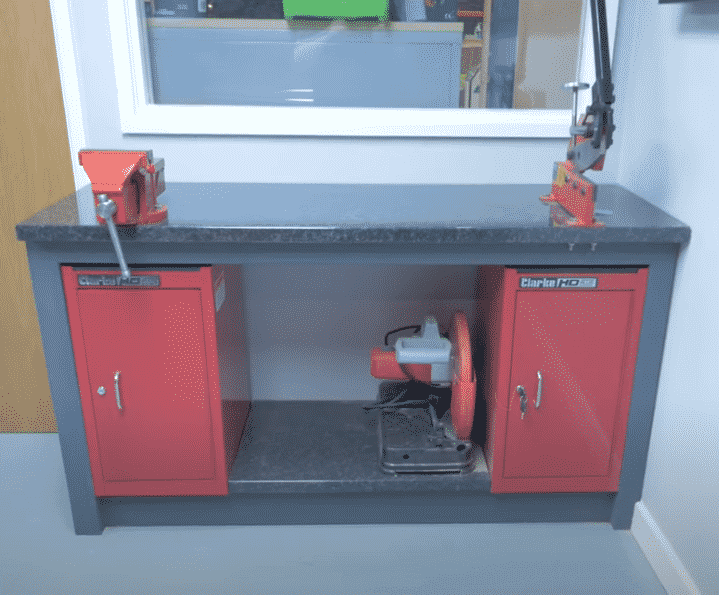
Nous devions fabriquer un établi afin de désencombrer notre espace de studio et de l'utiliser de manière plus efficace. Nous avons quelques projets passionnants nous avons besoin de l'espace supplémentaire que la création d'un établi offrirait. Mais, nous voulions aussi le faire avec un budget limité. Donc, nous recyclé deux armoires à outils Clarke HD et un peu de surface de travail restante pour créer un espace de travail polyvalent et gain de place, ainsi qu'un endroit pour notre petite scie à ruban Axminster, scie à métaux et scie à onglet.
Jetez un œil et découvrez la construction complète ici!

Nous avions déjà un peu de plan de travail de 40 mm qui restait de l'époque où nous avons installé nos rouleaux. Pas assez pour tout, mais certainement assez pour une étagère. Mais nous devrions en acheter un peu plus pour le dessus. Nous avions également nos armoires à outils Clarke HD qui étaient à l'origine destinées à être des armoires latérales pour notre rouleau. Mais cela ne s'est pas vraiment passé comme ça car elles étaient beaucoup plus courtes. Donc, c'est une très bonne façon de les réutiliser.
Nous avons calculé qu'il nous faudrait environ 20 mètres de bois CLS 3×2, ainsi que l'atelier supplémentaire, pour nous rendre à notre B&Q local afin d'obtenir ce dont nous avions besoin.
Planification du cabinet.
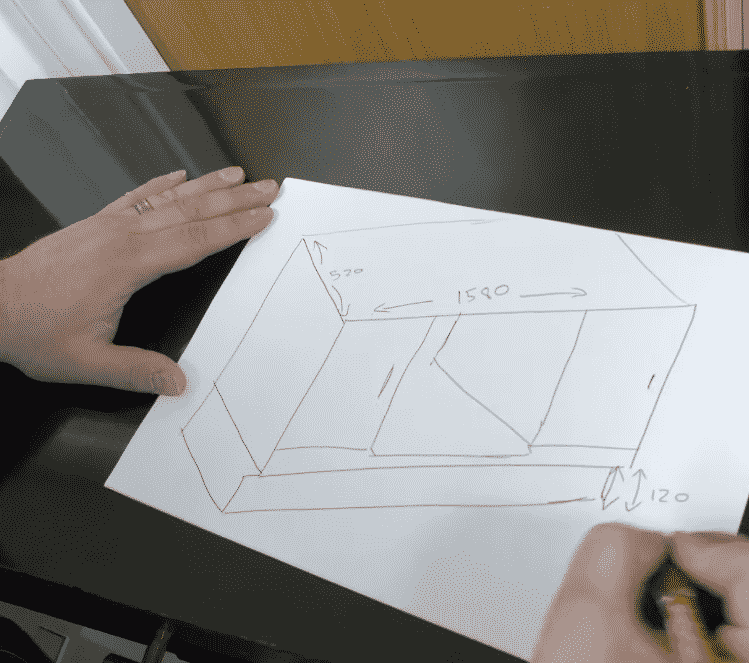
Comme nous le disons toujours, la planification est la partie la plus importante du processus. Donc Jonathan, comme toujours, a rédigé ses propres plans pour la construction afin de nous offrir le rangement gain de place optimal que nous souhaitions pour cet usage.
Nous savions la hauteur optimale que nous voulions pour le service de travail principal, et évidemment la hauteur des placards Clarke Tools réutilisés, puis le reste a été planifié autour de cela.

Cependant, il s'avère que ce que nous n'avons pas tout à fait pris en compte dans ces plans était :
* Largeur de base
Nous avons rendu la base un peu trop large pour s'adapter à l'espace.
* Hauteur de l'étagère
La scie à ruban qui était l'inspiration originale pour le banc de travail ne rentrait pas sous le comptoir. De loin ! Oups.
Mais comme on dit, "nous ne faisons pas d'erreurs, nous faisons des heureux accidents !" Chaque jour est un jour d'école...

Adapter la construction
La largeur du meuble était facile à surmonter car nous avons simplement retiré une petite section de plinthe et obtenu l'ajustement parfait.
Cependant, étant donné le contretemps que nous avons rencontré avec la construction et la hauteur de l'étagère, nous avons dû adapter légèrement son utilisation. Nous avons ajouté à une extrémité du plan de travail un étau robuste, et à l'autre extrémité une cisaille à métaux Sealey. Cette dernière est quelque chose qui va nous être vraiment utile car elle peut couper jusqu'à 6 mm d'acier et sera inestimable dans un projet que nous avons prévu bientôt.
Donc, la scie à ruban Axminster est toujours à la recherche d'un foyer. Mais il est bon d'être flexible parfois avec ces choses, n'est-ce pas !?
Le résultat
Donc, pour moins de 150 £, et en environ 4 heures, nous avons réussi à réaliser un établi fini. Il ne correspondait pas tout à fait à notre cahier des charges initial, mais néanmoins nous en sommes plutôt contents. Ce serait super de savoir ce que vous en pensez et s'il y a quelque chose que vous auriez fait différemment.
Nous étions également ravis que ce projet de "bootstrapping", comme nous l'appelions, ait été repris par notre presse locale, avec le Northwich Guardian qui a publié ce morceau sur cela.

Nous aimerions également voir si vous avez essayé de fabriquer un établi. Nous sommes tous axés sur l'inspiration d'idées et le partage de ce que les autres créent pour aider à inspirer les autres. Alors, veuillez consulter notre réseaux sociaux pour plus d'idées, ou pour partager vos créations épiques. Notre communauté facebook est un excellent endroit pour obtenir du soutien et des conseils avec des créations aussi, alors n'hésitez pas à passer !


