order before 2pm
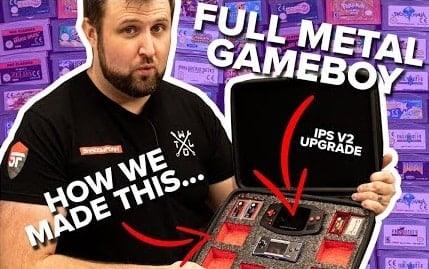
Erstellen eines verrückten Custom Game Boy Gehäuses
Wir wollten ein Projekt wieder aufgreifen, das wir vor ein paar Jahren begonnen haben. Wir haben einen Game Boy Advance SP und einen Haufen Spiele, darunter Retro-Klassiker wie Sonic und Pokemon Ruby, um nur einige zu nennen. Seit wir gemacht haben unser erster Fall für tragbares Gaming vor ein paar Jahren mit dem jetzt eingestellten Shadow Foam Original, wir haben unsere Spielesammlung massiv erweitert. Daher war ein Upgrade für unser Gameboy-Gehäuse dringend erforderlich. Wir haben ein neues Gehäuse von Amazon ausgewählt, das ein Smatree. Es ist ein weicher, mit Reißverschluss versehenen Hülle, die perfekt für dieses Projekt geeignet ist. Und um unser Upgrade perfekt zu ergänzen, werden wir Ihnen das großartige Boxy Pixel vorstellen.

Das neue Gehäuse ist etwas breiter und etwas tiefer als das Original. Es wird bereits mit einigen Plastikeinsätzen geliefert, aber wir können diese leicht entfernen und durch ein Stück Shadow Foam ersetzen. Dadurch wird es an unsere genauen Bedürfnisse anpassbar.
Was ist darin?

Jonathan gesteht, dass er kein Gamer im moderneren Sinne des Wortes ist! Aber er hat seinen ursprünglichen Game Boy aus dem Jahr 2002, mit dem er seit seinem 12. Lebensjahr spielt, immer geliebt. Der Bildschirm dieser Konsole wird jetzt ein wenig dunkel, also machte er sich auf die Suche nach einer Lösung, ganz typisch für ihn. Und Junge, hat er eine gefunden. Das ist von Boxy Pixel and it’s an upgraded, milled aluminium Game Boy Advance. Ours is in black with ruby red highlights that make it look super cool. First thing is it’s got a lithium battery in it rather than the old AA batteries. So now it’s rechargeable with a USBC charger. It’s also got great quality aluminium buttons and a hugely upgraded screen. This is an IPS v2 screen so it’s super bright!

Was wir anstreben, ist eine ziemlich typische Lösung für jeden, der einen Game Boy und Spiele hat. Wir möchten das Ultimative im tragbaren Gaming schaffen, damit Ihre wertvolle Konsole und Spiele immer organisiert und geschützt sind, egal ob Sie reisen oder unterwegs sind. Das erste, was wir tun müssen, ist, das neue Gehäuse auszuräumen, etwas Schaumstoff hineinzulegen und von dort aus weiterzumachen.
Was brauchen wir noch, um das Gameboy-Gehäuse zu erstellen?
Wir haben uns entschieden, 30 mm Red Schaumstoff für das Gehäuse zu verwenden. Ein Trick, um den Schaumstoff perfekt in das Gehäuse einzupassen, ist, den ursprünglichen Einsatz, den wir entfernt haben, als Vorlage zu verwenden. Dann einfach drumherum schneiden. Einfach! Die ungefähren Kosten für diesen Schaumstoff, wenn Sie ihn auf unserer Website kaufen würden, betragen etwa £9,00. Wir werden auch einen unserer Schneidekits. Wenn Sie keine Schutzhandschuhe zu Hause haben, empfehlen wir Ihnen dringend, diese zu besorgen. Zusammen mit dem Skalpell und den Klingen sind auch diese enthalten, und wir möchten wirklich, dass Sie diese beim Schneiden von Schaumstoff jederzeit tragen.
Nachdem wir die Größe des Inserts grob zugeschnitten haben, gehen wir zurück und erstellen die Radien an jeder Ecke. Wiederum verwenden wir das ursprüngliche Insert als Vorlage, um hier ein schönes, genaues Ergebnis zu erzielen. Aber wenn Sie ein Gehäuse haben, das kein Insert hat, das Sie kopieren können, brauchen Sie keine Angst zu haben. Wir haben auch dafür eine Lösung! Hier ist ein Link zu einem Hack, den wir vor einiger Zeit geteilt haben, wie man erstellen Sie Ihre eigene Schaumstoffeinlage Für jeden Fall. Sobald die Ecken fertig sind, erstellen wir auch einen Radius für die inneren Kanten des Gehäuses. Dies wird einfach freihändig und nach Augenmaß gemacht, wobei nur das Minimum an Schaumstoff abgetragen wird, das für einen engen Sitz erforderlich ist.
Planung des Layouts für dein Gameboy-Gehäuse
Die Planung ist der nächste große Teil des Projekts, sie dauert normalerweise am längsten im gesamten Prozess. Und dieses Mal hat sie uns einige Richtungsänderungen aufgezeigt!
Wir wissen, dass wir durch das Aufstellen der Spiele auf der Kante viel mehr unterbringen können, als wenn wir sie flach hinlegen. Das bedeutet jedoch, dass wir die Artwork nicht sehen und nicht wissen, welches Spiel es ist. Wir dachten, wir wären damit zufrieden, aber als wir anfingen, stellten wir fest, dass es nicht gut aussah. Also gab es eine Neugestaltung und wir entschieden uns stattdessen für das Stapeln der Spiele, was viel besser aussah. Wir stapelten sie drei Spiele tief, wobei die weniger oft gespielten unten waren. So sind die häufiger gespielten wie Pokémon Rubin und all unsere Favoriten oben.

Wir sind wirklich zufrieden mit dem Ergebnis, es ist eine großartige Verbesserung gegenüber dem Original. Wir haben jetzt ein kompaktes, tragbares und völlig eigenständiges kleines Gameboy-Gehäuse, das sich hervorragend für unterwegs und auf Reisen eignet.

