order before 2pm
¿La cámara perfecta, portátil, batería y almacenamiento de audio? (Parte 2 - cámara / baterías)
Habíamos sido culpables de enfrentar repetidamente la peor pesadilla de cualquier camarógrafo con la falta de organización en nuestro almacenamiento de cámaras. Recientemente nos hemos mudado de hacer la mayor parte de nuestra filmación en un solo lugar a estar más fuera y sobre la marcha. Así que nuestro almacenamiento no había crecido para acomodar eso y sentimos que necesitábamos una buena solución de almacenamiento portátil para cámaras. Un problema con el que seguíamos encontrándonos era la gestión de baterías. Hemos acumulado bastantes baterías a lo largo de los años, así que no había excusa para no tener energía más que simplemente no planificar y organizarlo lo suficientemente bien. Así que todo necesitaba un poco de lo que normalmente hacemos mejor... ¡organización! batería portátil de cámara carga almacenamiento de cámara cámara portátil almacenamiento de cámara carga de batería
¿En qué contenedores organizaremos el kit?
Este es un proyecto un poco monstruoso ya que tenemos tanto equipo. Realmente queríamos ser inteligentes sobre la forma en que lo hacemos. Así que hemos seleccionado un Nuprol estuche para el equipo de cámara y un Mochila Powerextra para el kit de audio. Encontrarás mucha más información de fondo y detalles sobre cómo y por qué se seleccionaron aquí. También allí, entramos en más detalles sobre los principios y la metodología detrás de nuestra actualización planificada.
Nuestro kit de cámara
Nuestras cámaras son Panasonic GH5’s y usamos baterías de posventa para poner en estos, de Dura Pro. Es extrañamente más rentable comprar estos en paquetes dobles que vienen con un cargador. Así que a lo largo de los años hemos terminado con bastantes cargadores 'de repuesto'. Esto parecía un desperdicio, que no es lo que buscamos. Pero ahora, hemos ideado un plan para darles un buen uso. carga de batería de cámara portátil almacenamiento de cámara
Estación de carga de baterías
Para implementar nuestra solución de batería, obtuvimos una serie de Sabrent Concentradores de datos USB de 4 puertos. Son geniales ya que extienden 1 puerto USB a 4 con 4 interruptores de alimentación individuales. Esto significa que cuando un puerto de batería muestra que las baterías están completamente cargadas, puedes apagar la alimentación de ese cargador individual. Brillantemente, también hay una pantalla de nivel de batería en la unidad de carga. Por lo tanto, podemos ver una vez que un conjunto está completamente cargado y usar el interruptor para apagarlo.
También tenemos la capacidad de cargar estas baterías de dos maneras. Ya sea a través del interruptor de encendido mediante un banco de energía de batería, o con la energía eléctrica tradicional. Pero, obviamente, antes de montar todas las piezas y ajustarlas en la caja, necesitábamos asegurarnos de que nuestra teoría funcionara. ¡Así que hicimos una prueba y funcionó incluso mejor de lo que esperábamos! ¡Así que ahora estábamos listos para empezar!
Como solución móvil, los cargadores de batería USB que están conectados a los centros de datos serán alimentados a través de un Satechi banco de energía. Esto nos ofrece la impresionante cifra de 50,000 miliamperios hora. Esto normalmente vendría con un cable en figura de 8, pero para este proyecto lo reemplazamos con nuestro propio cable retráctil en figura de 8 Retrak. El nuestro tiene un enchufe de corriente del Reino Unido que se pliega en un extremo y un cable de adaptador de corriente en el otro extremo. Esto simplemente hará que sea un poco más ordenado para nosotros cortarlo en el almacenamiento de manera ordenada. Esto luego se conectará al adaptador de corriente. El nuestro es un adaptador de 20 vatios con una función de carga rápida (3 amperios en lugar de solo 2.4). Esto se conecta al banco de energía a través de un micro USB.
Planificación del diseño del estuche
Debido a la forma en que se puede arrastrar la maleta como una alternativa a ser llevada, necesitábamos pensar realmente en qué iba dónde dentro de la maleta.
Para esto decidimos colocar el equipo de la cámara más cerca del suelo / ruedas. De esa manera, si el estuche se caía al ser movido, las lentes y cámaras delicadas, etc., estarían más cerca del suelo. Pero además, todas las cámaras y el equipo asociado son mucho más pesados que las baterías más ligeras, etc. Así que posicionarlo de esta manera facilita y equilibra más al arrastrarlo. carga de batería de cámara portátil almacenamiento de cámara
Creando la función de carga de la batería
Primero cortamos un trozo de melamina al tamaño que queríamos para la sección de la batería. Luego, tuvimos que añadir radios en dos de las esquinas para que encajara perfectamente en el estuche Nuprol. Eso fue bastante fácil de hacer después de marcar el radio con nuestro set de plantillas.
A continuación, también tomamos un conjunto de nuestros Inserciones de estuche grande Nuprol, hecho a medida para encajar en estos casos. Vienen en paquetes de dos con una hoja de 50 mm y una hoja de 30 mm incluidas. Planeamos usar la capa de 30 mm en la tapa y poner nuestro logo en ella. La hoja inferior de 50 mm se colocará debajo de donde iba a estar el Melamina. Primero, cortamos una sección completa del tamaño de la estación de batería que estamos haciendo. Luego, tomamos una sección de aproximadamente 30 mm de profundidad de lo que habíamos cortado. Al cortar una apertura a través de ella, pudimos posicionarla debajo del Melamina para dar espacio a nuestros cables y también ayudar al flujo de aire.
Por último, tenemos esta parte, perforamos agujeros en la tabla para que los cables de los cargadores, etc., pudieran pasar. Al usar pegamento caliente, pudimos pegar el aparato a la tabla para una sujeción firme.
Usamos una etiquetadora Dymo para numerar cada interruptor con su estación de carga correspondiente. Esto solo significa que podemos ver que un conjunto está cargado y podemos apagar esa unidad de cargador individual para ahorrar energía.
El conjunto completo de 16 baterías ahora se puede utilizar para cargar ya sea a través de la red eléctrica o mediante la batería. Y costó alrededor de £245 en total. Creemos que vale cada centavo en términos de ahorro de tiempo y nunca perder grabaciones por falta de energía.

Usando la espuma para almacenar las cámaras y lentes
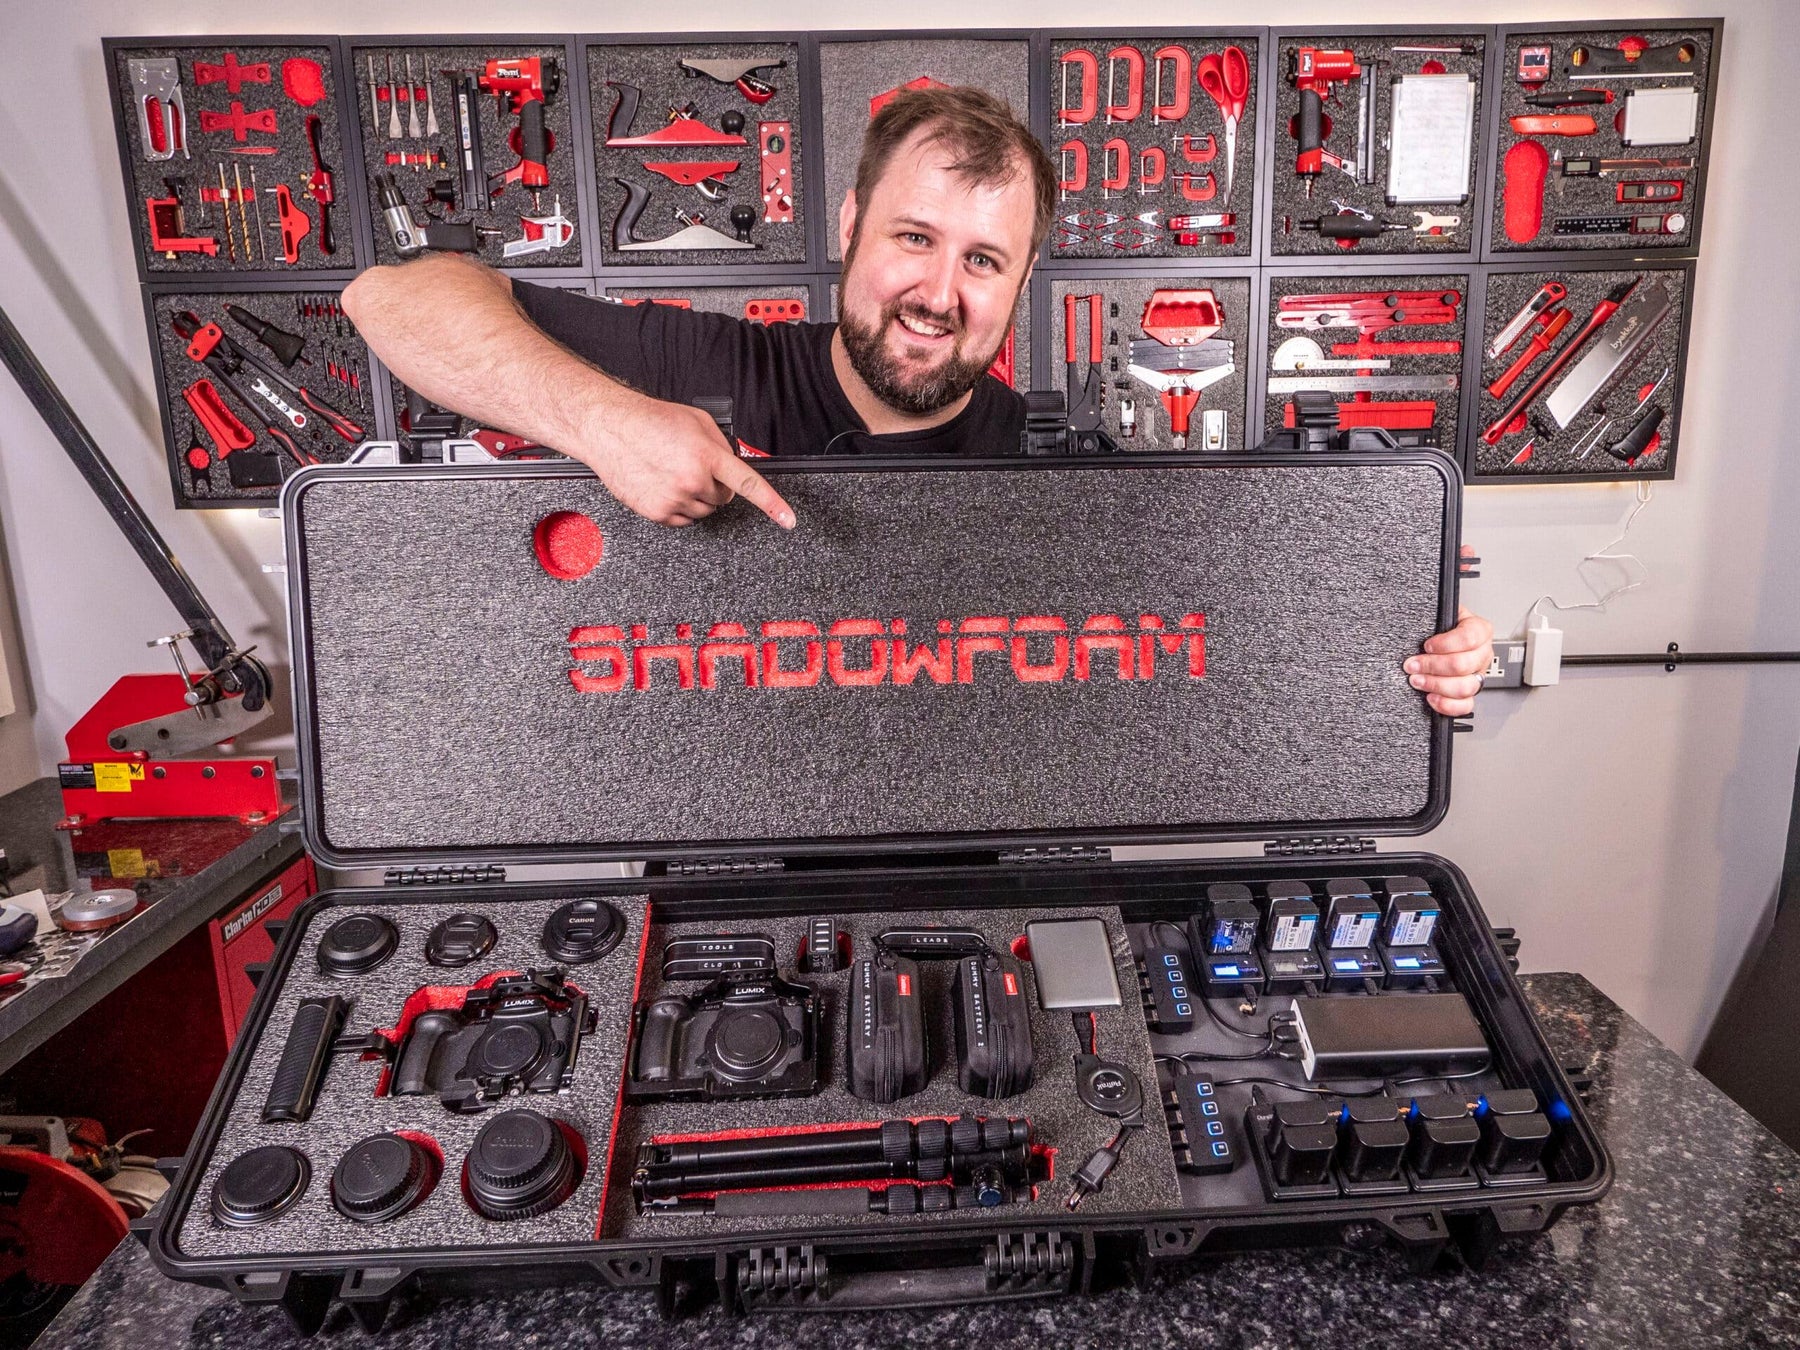
Como siempre decimos cuando Sombrafoam, la planificación es clave. Por lo general, resolver tanto como sea posible del diseño en esta etapa sería realmente importante. Sin embargo, también tuvimos que improvisar un poco con este proyecto. Especialmente dada la profundidad y las formas de algunos de los artículos que queríamos almacenar. La primera y principal cosa que queríamos cortar fue nuestra Panasonic GH5 en su carcasa pequeña con su mango ya puesto. Tenía sentido almacenarla en la espuma equipada y lista para usar en lugar de desmantelada. Esto será mucho más eficiente en tiempo cuando estemos en rodajes.
Nuestra otra cámara y lentes se pueden ajustar alrededor de eso. Junto con algunas latas pequeñas que recogimos, que son realmente útiles para almacenar pequeños artículos como paños de pelusa, tarjetas SD, etc. Además, hemos puesto cosas como cables en algunos estuches suaves con cremallera para hacerlos más fáciles de cortar en la espuma.

Así que tenemos nuestra espuma y nuestra kit de corte (containing our all important safety gloves). Y con una idea general de qué va dónde, ahora es el momento de comenzar cutting.
Solución de problemas
¡No habíamos empezado cuando encontramos un obstáculo! Pero no uno insuperable. Con la profundidad y la circunferencia variable de nuestras lentes y también el hecho de que el pequeño mango del rig en la cámara no estaría en la espuma a la profundidad en la que estaba, necesitábamos hacer algunos ajustes. Afortunadamente, pudimos usar el resto de la pieza de espuma que habíamos retirado del otro extremo donde ahora estaba el Melamina. Lo adjuntamos a la parte superior de la espuma existente usando nuestro spray adhesivo. Esto significaba que podíamos profundizar mucho más en la espuma. Ahora podemos alojar las lentes de manera mucho más segura y también asegurar que todo el equipo de la cámara estuviera seguro en la espuma.

Así que, con eso hecho, podríamos continuar con el proceso de corte y pelado para alojar el resto del kit. Siempre vale la pena volver a familiarizarse con las mejores técnicas para pelando la espuma antes de comenzar tu propio proyecto. Además, para este trabajo también incorporamos el nivel adicional de refinamiento que nuestro espuma de suavizado giradores traer.
Solo una de nuestras lentes resultó ser demasiado alta, incluso cuando se cortó completamente en la espuma. Eso también fue fácil de arreglar cortando un agujero correspondiente en la capa superior de espuma. Así que ahora estaría protegida por ambas capas, la superior e inferior. ¡Importante cuando las lentes son piezas de equipo tan caras!
Al final también pudimos incluir un tamaño completo, plegable Sirui trípode. ¡Esto será súper conveniente y significa una cosa menos de la que preocuparse al llevar por separado o olvidar!

Toques finales
Todo lo que quedaba entonces era poner nuestro sello distintivo en las cosas. Como siempre, cortamos a mano el logotipo de Shadow Foam en la espuma en la tapa del estuche. Hicimos esto simplemente usando una plantilla de papel impresa para cortar un contorno poco profundo a través de eso. Luego, al quitar la capa superior Black, se muestra nuestro logotipo en la revelación. Es realmente llamativo con el toque del Red debajo. Puedes replicar esto tú mismo con cualquier marca o personalización que desees agregar a tu propio almacenamiento. Tenemos más detalles e inspiración sobre eso para ti aquí.
Así que, aquí está el resultado final… ¿qué piensas?
Por supuesto, el siguiente paso en el proyecto será organizar el almacenamiento para el equipo de audio. El kit de cámara no está completo sin todos los micrófonos, etc., que usamos con este kit de cámara portátil. Así que ese proyecto se avecina muy pronto, así que estate atento a ello.


