Chiusura giornaliera degli ordini alle 14:00
La perfetta, portatile fotocamera, batteria e archiviazione audio? (Parte 3 - kit audio)
Quando realizzi molti video come facciamo noi, è importante assicurarti di avere tutto a portata di mano. Essendo nel settore in cui operiamo, vogliamo anche che sia organizzato, protetto e facile da trovare. E, cosa ancora più importante, in modalità ready-to-go ogni volta che ne hai bisogno. Come potresti aver visto dal nostro post su come apportare alcuni miglioramenti alla nostra configurazione, abbiamo già affrontato la custodia della nostra fotocamera con risultati sorprendenti. Ora è il momento di fare lo stesso con il nostro kit audio . Nello specifico, il nostro microfono Rode è configurato e consente la ricarica in movimento.
In cosa conserveremo il kit audio?
Abbiamo optato per uno zaino perché ci permetterà di portarlo ergonomicamente sulle spalle. Principalmente si tratta di tenere le mani libere per filmare o trasportare la custodia della nostra attrezzatura fotografica Nuprol. Recentemente abbiamo anche organizzato alcuni strumenti in uno zaino Dewalt e abbiamo avuto un grande successo. In questo modo abbiamo imparato che, anche con attrezzature pesanti, il peso è distribuito in modo più uniforme, rendendolo più facile e sicuro da trasportare. creazione video del kit audio con microfono rode
È frustrante che lo zaino PowerExtra che abbiamo ricevuto non sia più disponibile. Abbiamo trovato la dimensione e la formazione perfette per ciò di cui abbiamo bisogno. È multifunzionale ma è stata progettata specificamente per essere una borsa da viaggio per fotocamera DSLR. Dispone inoltre di un'ampia cavità per consentire la conservazione di numerosi kit. Inoltre, poiché il pannello posteriore si apre completamente, ci fornisce l'accesso necessario per inserire la schiuma. Come bonus totale, anche il rivestimento interno della custodia può essere estratto. Questo ci dà un modello perfetto da utilizzare per tagliare la nostra schiuma su misura! Vedi, sempre alla ricerca dei modi di lavorare più efficienti!

Cosa sta succedendo lì dentro?
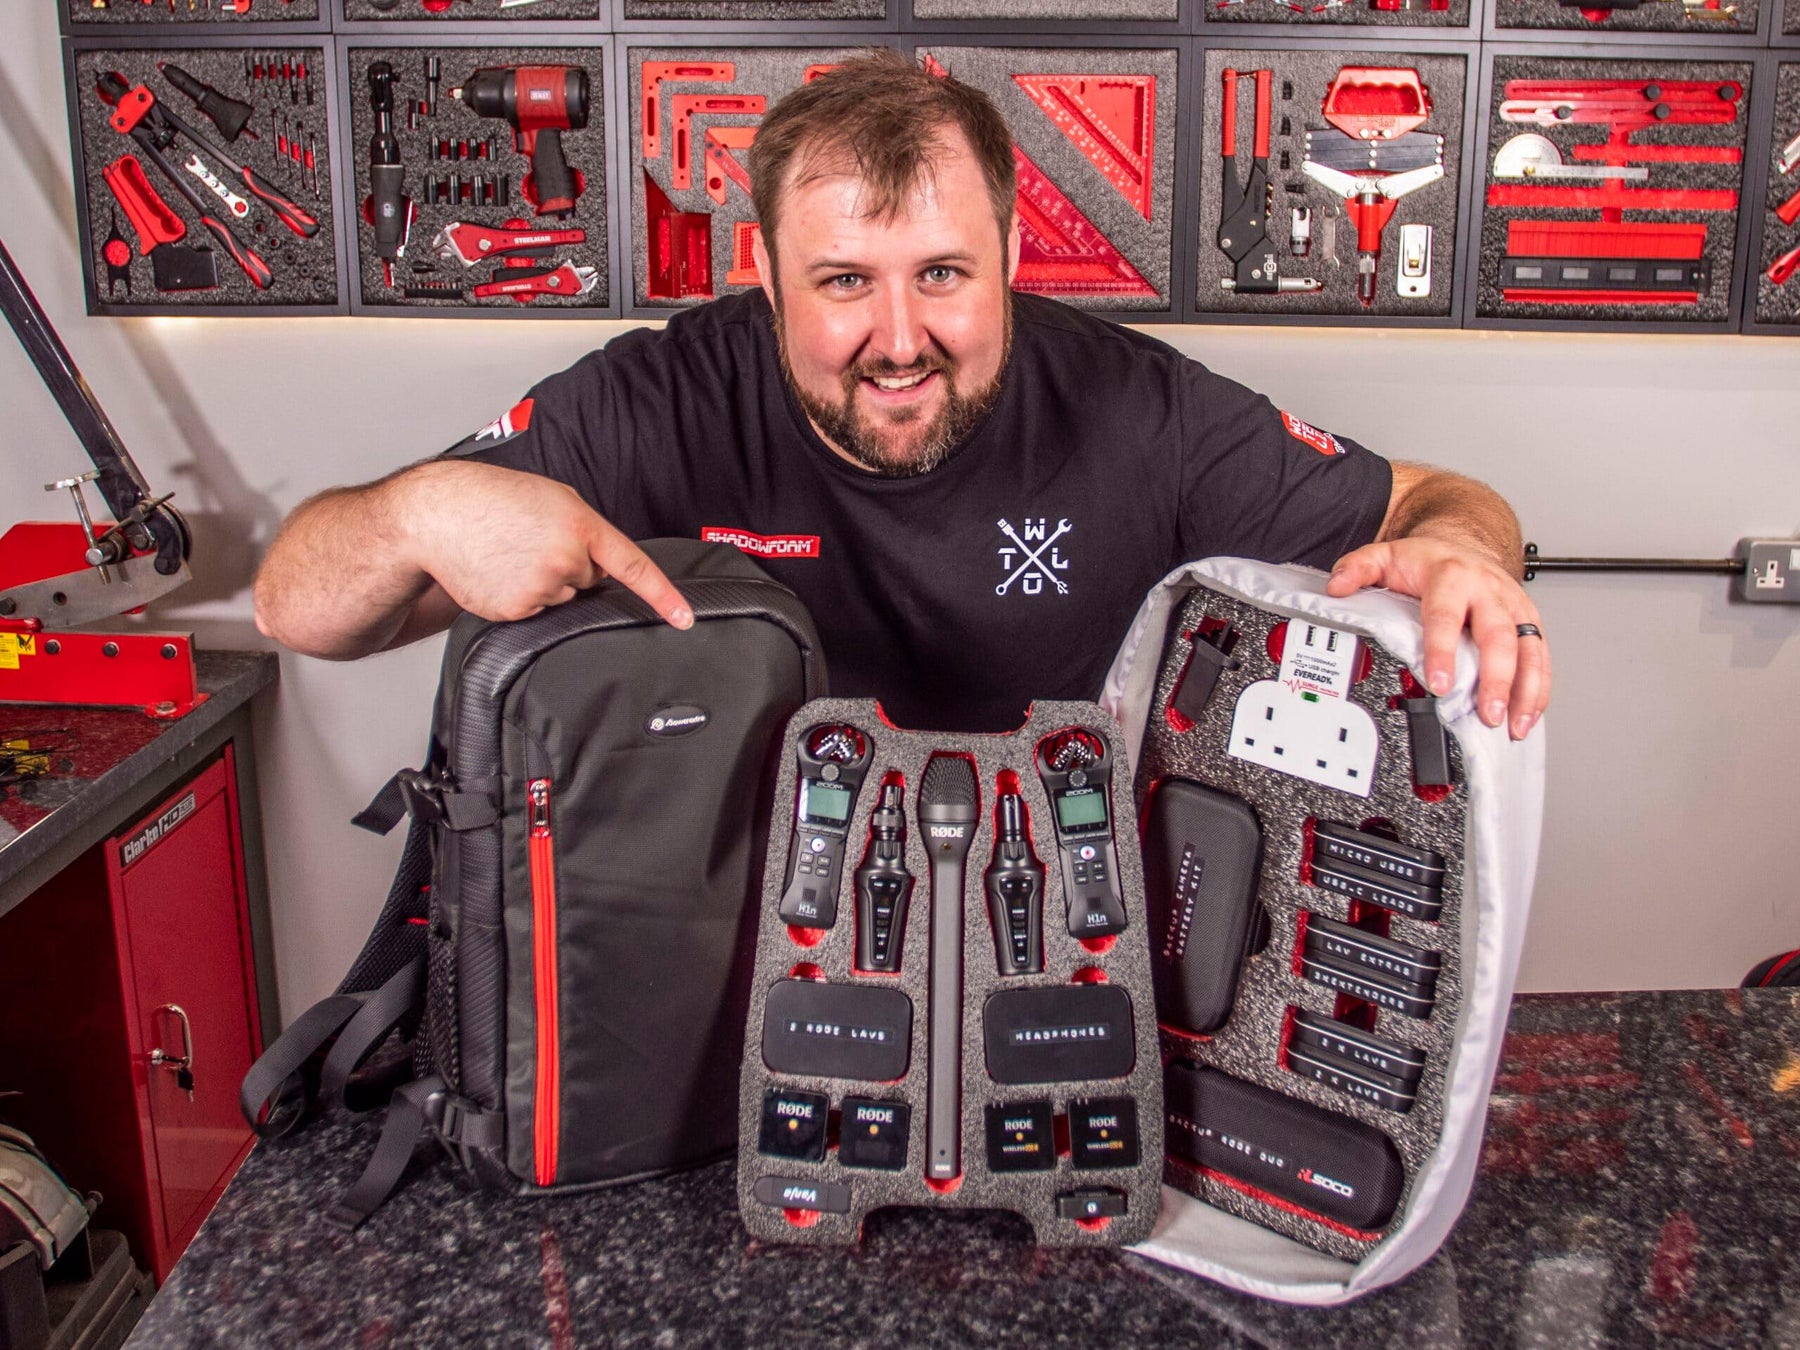
Dal punto di vista della profondità, questa borsa ci consentirà di montare uno strato di schiuma da 70 mm e uno da 50 mm. Per questo è fantastico. Abbiamo perfezionato il nostro kit negli ultimi 6-7 anni, quindi abbiamo solo gli elementi essenziali di cui potremmo aver bisogno in ogni situazione. Ma ovviamente abbiamo anche bisogno di ridondanza e di backup, nel caso in cui dovessimo riscontrare problemi tecnici mentre siamo in viaggio. Quindi, anche se questo è stato perfezionato e ridotto al minimo nel corso del tempo, è ancora un sacco di kit! creazione video del kit audio con microfono rode
- 2 x Zoom H1N
- 6 x Rode Lav (noto anche come microfono lavalier) – archiviati in 3 set da 2 – 1 principale e 2 di backup
- 1 microfono portatile Rode
- 1 trasmettitore/ricevitore Kimafun
- 2 set duo di microfoni Rode (2 trasmettitori/1 ricevitore) – 1 principale e 1 di backup
- 1 assolo wireless Rode
- 1 kit di backup della fotocamera (in aggiunta a tutto ciò che è nella memoria della nostra fotocamera principale)
include: 5 batterie
Caricatore di riserva
Guida - 1 x doppio adattatore di rete (con 2 punti di ricarica USB)
- 2 adattatori USB (trasformeranno ciascuno dei due punti di alimentazione sopra in 4 punti di ricarica USB, per un totale di 10)
- 1 scatola di micro USB
- 1 scatola di cavi USB-C
- 1 barattolo di lav extra (convertitori)
- 1 barattolo di estensori lav
- 1 adattatore USB/SD
Ulteriori cose per aiutare a organizzare e archiviare:
Per le scatole le abbiamo acquistate all'ingrosso da Amazon. Sono davvero utili per conservare tutti i tipi di pezzi più piccoli che altrimenti potrebbero andare persi. Potresti usare altrettanto facilmente una scatola di Altoids o qualcosa di simile se ne hai una in giro. Questo è quello che abbiamo fatto quando abbiamo realizzato la nostra valigetta portautensili compatta .
Avevamo anche alcune custodie morbide con cerniera leggermente più grandi, utili per riporre oggetti leggermente più grandi. A volte gli oggetti potrebbero non prestarsi a essere tagliati nella schiuma, quindi è qui che tornano utili.
Tutto quanto sopra è stato chiaramente etichettato utilizzando la nostra etichetta in rilievo Dymo r. Ora possiamo trovare tutto ciò di cui abbiamo bisogno molto velocemente. creazione video del kit audio con microfono rode

Come è fatto
Abbiamo tagliato la nostra schiuma in forme rettangolari di dimensioni simili. Puoi farlo realizzando una schiuma su misura o tagliando un foglio da una confezione conveniente o da un foglio medio . Avrai bisogno anche di attrezzature da taglio. Stiamo utilizzando il nostro kit di taglio completo che consigliamo sempre. Questo contiene anche guanti di sicurezza e la nostra colla per riparazioni in caso di errori. creazione video del kit audio con microfono rode
Utilizzando il rivestimento interno rimovibile della custodia siamo stati facilmente in grado di tracciare il taglio attorno al bordo della stessa. Questo ci ha dato due fogli identici sia sul liner da 70 mm che su quello da 50 mm. I 70 mm andranno nella base e quindi non sarà necessario rimuoverli molto, se non del tutto. Ma poiché lo strato superiore da 50 mm deve essere rimosso per avere un accesso più facile allo strato più spesso sottostante, abbiamo apportato alcune modifiche. L'abbiamo reso leggermente più piccolo in modo che entri ed esca più facilmente. Ma sono state aggiunte anche maniglie nella parte superiore e inferiore per la massima comodità.
Ci siamo quindi presi del tempo per pianificare il nostro layout. Come diciamo sempre ogni volta che esegui lo shadowfoam , questa è una parte davvero importante del processo, quindi non dovrebbe essere affrettato. Per noi, volevamo gli oggetti che usiamo più spesso nella parte superiore, quindi gli elementi di backup nella base.
Una volta soddisfatti del layout, era solo il momento di tagliare e staccare per adattare gli oggetti alla schiuma. Vale sempre la pena utilizzare le nostre guide “ come fare ” prima di iniziare. Soprattutto se è la prima volta che lavori con Shadow Foam.
Tocchi finali.
Abbiamo anche utilizzato sia il nostro righello che il nostro set di stencil . Ciò significava che potevamo ottenere dei tiri con le dita dall'aspetto davvero ordinato per alcuni oggetti per renderli più facili da estrarre. Ciò è particolarmente importante in questo caso. Altrimenti, quando tutto è imballato in un sacchetto “schiacciabile”, la schiuma può essere leggermente compressa attorno al suo contenuto. Tirando con le dita è ancora possibile tenere saldamente il dito per rimuoverlo.
Eravamo davvero contenti di come appariva, dato che tutto era a filo senza nulla che sporgesse, il che significava che sarebbe stato riposto ordinatamente. E abbiamo apportato un paio di piccoli trucchi o modifiche per portare il tutto ad un altro livello:
Trucco n. 1
Con l'alimentatore, volevamo che fosse a filo con la schiuma. Quindi abbiamo tagliato il profilo superiore nella schiuma, ma poi abbiamo tagliato una cavità extra profonda dove i perni dovevano alloggiarli ordinatamente senza spingere la presa fuori dalla schiuma.
Trucco n.2
Per sfruttare al massimo lo spazio a nostra disposizione, abbiamo sovrapposto alcuni elementi all'interno dei singoli strati di schiuma. Ad esempio, con il microfono portatile, una volta rimosso, rivela il cavo di prolunga XLR sottostante, ben riposto per quando è necessario. E abbiamo fatto lo stesso con il trasmettitore/ricevitore Kimafun in modo che gli ariel fossero alloggiati sotto di essi.
Mettendo tutto insieme
Una volta inseriti gli inserti nella borsa, in realtà servivano a dare alla borsa un po' più forza e forma. Ma si chiudeva comunque facilmente. creazione video del kit audio con microfono rode
Abbiamo aggiunto le nostre carte per le interviste alla tasca piatta frontale della borsa. E nella grande tasca frontale imbottita, è lì che può stare tranquillamente il nostro laptop, così possiamo trasferire e rivedere facilmente le riprese sul posto. L'alimentatore per il laptop può quindi essere riposto in sicurezza nella tasca anteriore della borsa. creazione video del kit audio con microfono rode

Quindi, insieme alla nostra custodia per fotocamera Nuprol , pensiamo di avere ora la soluzione perfetta per organizzare le riprese mobili . Ma dai un'occhiata e vedi cosa ne pensi. Ci piacerebbe sapere quali altre idee hanno le persone per migliorare questo in futuro, quindi per favore mettiti in contatto con i tuoi pensieri.








 Kit di taglio gratuito per ordini qualificati
 Oltre 3.000 recensioni positive
 Oltre 500 video su YouTube
 Assistenza nel Regno Unito