Cierre de pedidos diario a las 2 p.m.
Organizando tu Stanley FatMax ProStack como un experto
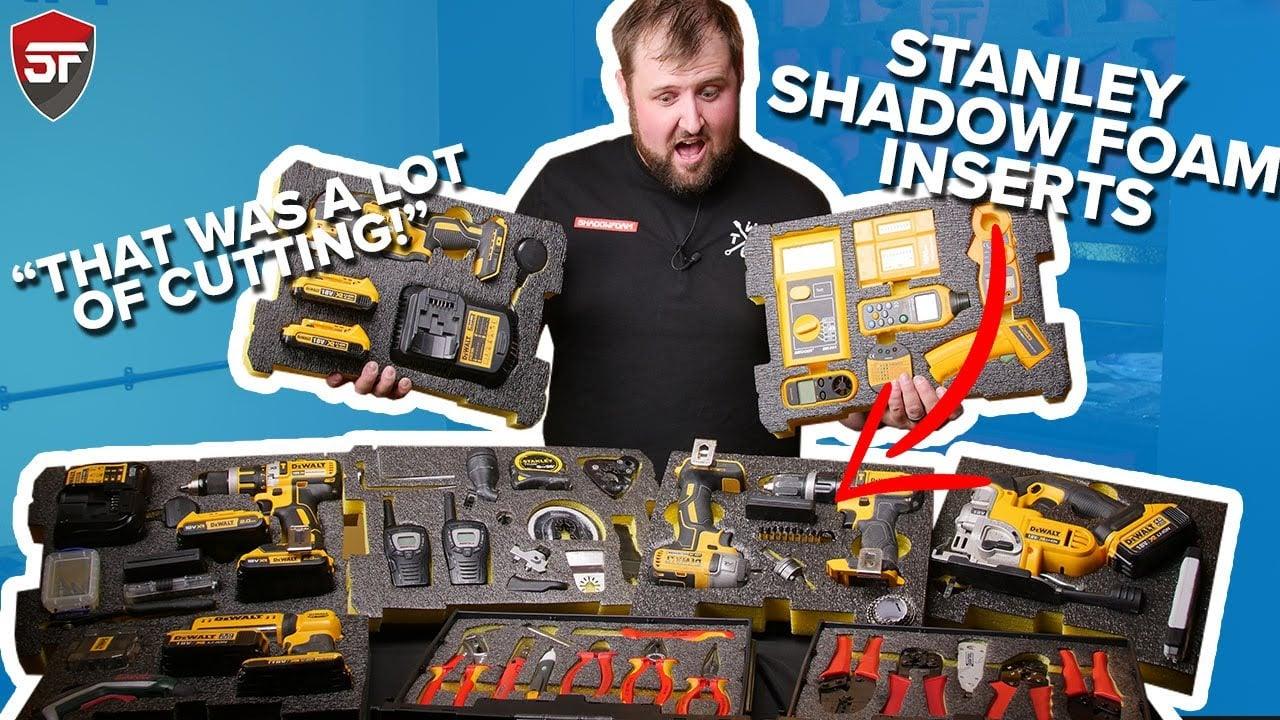
Se podría decir que tenemos demasiados ProStacks. Igualmente, tenemos todos los organizadores de espuma Stanley FatMax Inserts ¡Podríamos desearlo también! Así que eso nos da una buena oportunidad para inspirarte sobre cómo puedes dominar totalmente con tu propia organización Stanley FatMax ProStack. Ya sea que tengas una de sus cajas de cajones poco profundos o una caja de cajones profundos. Una caja de herramientas profunda o la caja de herramientas de altura estándar. ¡Lo que sea que tengas, tenemos inspiración y consejos para el Organizador FatMax para ti!

Todos los artículos de ProStack en los que hemos trabajado
Ya hemos estado trabajyo en la caja de herramientas de altura estándar utilizando el Stanley FatMax ProStack Caja Espuma Insertos. Queríamos organizar y proteger un taladro combinado DeWalt y algunos accesorios. Probablemente ya sepas que los insertos para esta gama y la gama DeWalt TSTAK son compatibles ya que las huellas de las cajas son las mismas. Así que el Yellow y Black de la caja, el taladro y el inserto funcionan brillantemente juntos. Pero si quieres mezclarlo en términos de Colour, es súper simple con nuestros insertos de espuma. Ya están cortados para adaptarse a tu caja de herramientas o cajón: solo selecciona el Colour y la profundidad que deseas y listo.
También hemos trabajado en las cajas de cajones poco profundas Prostack que puede que haya visto en un película anterior. Estos son perfectos para herramientas de mano más pequeñas, ya que los cajones miden aproximadamente 35 mm y nuestros insertos tienen un tamaño de 30 mm. Eso los convierte en forros ideales para almacenar y proteger cualquier herramienta de mano. Para estos, maximizamos la facilidad de uso al agregar tiradores para sacar y meter herramientas fácilmente.
Lo que aún no habíamos comenzado era el gran cajón inferior. Tampoco hemos abordado el problema perenne de qué hacer con tu caja profunda para aprovechar al máximo el espacio. Así que estos dos proyectos son donde comenzaremos ahora.
Stanley FatMax Pro Organizador cajón profundo
Lo mejor de estos organizadores es que están totalmente personalizados para lo que mejor funcione para ti. El caballero para quien estamos haciendo esto ha pedido una linterna LED, batería de repuesto, paquete de piezas y un destornillador Bosch allí. Como siempre, dedicamos un poco de tiempo a planificar la mejor disposición para los artículos antes de comenzar a trabajar. ¡Luego es hora de empezar!
Ya tenemos nuestro Stanley FatMax Pro Organizador insertar. Y nuestro Shadow Foam completo kit de corte. (nb, siempre recomendamos que consigas uno de estos para que puedas usar los guantes de seguridad al cortar!) Luego es hora de comenzar a cortar nuestros artículos en la espuma.
Una vez que hayas cortado los artículos, es hora de pelar - recuerda que hay un truco para hacer esto, así que siempre consulta nuestro “cómo hacer” película para obtener la técnica perfecta.
Una vez que todas las herramientas están justo como las queremos, evaluamos la necesidad de tiradores. La mayoría de los artículos sobresalen lo suficiente del foam que no los necesitamos. Sin embargo, el destornillador más pequeño realmente podría beneficiarse de ellos. Para crear los tiradores utilizamos nuestro set de plantillas que están disponibles a muy bajo precio en nuestra tienda en línea. Estos pueden ser muy útiles para cualquier cantidad de tareas.
Usando las herramientas anteriores, tendrás la guía perfecta para poder cortar tus propios insertos personalizados en casa. Por supuesto, un paso importante, especialmente con los cajones, es probar que todo encaje en el cajón. ¡Asegurarte de que el cajón se abra y se cierre una vez que hayas terminado es la parte gratificante! Si encuentras que algunas partes sobresalen un poco más de lo que deberían e impiden el mecanismo del cajón, puedes hacer lo que hicimos nosotros. Simplemente corta las partes que sobresalen un poco más profundamente en la espuma para lograr un acabado plano y agradable.

La caja de herramientas profunda Stanley Fatmax Prostack
Con esto podríamos poner aproximadamente 5 de nuestra espuma lista para usar. Organizadores FatMax ello. Eso no funcionará para nosotros en este caso ya que queremos tener algunos artículos más grandes en la parte superior. Pero ciertamente podemos incluir algunos allí.
El problema con estos casos profundos es que es difícil organizarlos ya que las cosas pueden simplemente moverse. Estamos creando esta caja para un ingeniero de datos. Así que queremos poner todo lo que más necesitan disponible en la parte superior, donde sea fácil de acceder. Con todos los artículos necesarios pero menos utilizados apilados más hacia el fondo.
Dentro de la caja, el ingeniero de datos tiene una herramienta multifuncional Dewalt, baterías y un cargador que quizás nos hayas visto cortar en espuma. anteriormente. En cuanto a sus walkie-talkies, accesorios multitool y varios otros artículos.

Así que al final nos quedamos con algunos equipos de corte, un probador de ethernet y varias herramientas de ingeniería de datos que aún necesitamos cortar. Usando el mismo proceso que antes, planeamos, cortamos cuidadosamente y luego despegamos las capas. Por supuesto, probamos la colocación de los artículos a medida que avanzamos. Con este equipo, todo queda bien nivelado, por lo que creará una bonita capa plana sobre la que colocar otros insertos. Sin embargo, esto también significa que necesitaremos agregar tiradores para ayudarnos a sacar y meter los artículos fácilmente. Nuevamente, utilizamos un proceso similar al anterior, pero solo usando una regla para mostrar lo fácil que es, incluso si no tienes uno de nuestros juegos de plantillas.
¿Cómo se compara la caja profunda?
- Capa inferior: un inserto Stanley Fatmax Prostack de 50 mm que contiene las herramientas de medición y corte
- A continuación, un inserto de espuma de 30 mm que contiene los walkie talkies, bits de herramientas múltiples, etc.
- Luego - un inserto de espuma de 50 mm que contiene la herramienta múltiple, baterías, etc.
- ¡Quedan 100 mm de espacio! Así que entra otro inserto de 50 mm que contiene herramientas eléctricas
Debido a que nuestras capas o insertos apilados no contienen demasiado peso, se deslizarán fácilmente dentro y fuera. Si deseas retirarlos con más frecuencia, incluso más fácilmente o si tus insertos contienen artículos más pesados, considera usar algo en la parte posterior. En el pasado hemos utilizado Correx, pero podrías usar fácilmente acrílico, tablero Dibond o cualquier cosa resistente y personalizable que tengas a mano. Todo lo que necesitas hacer es usar tu inserto de espuma como plantilla y luego cortar la parte posterior para que coincida con el tamaño y la forma, y pegarlo al inserto. Usamos nuestro spray adhesivo cada vez que hacemos esto, pero deberías estar bien con cualquier pegamento que tengas a mano en casa o en el taller.

Estamos bastante contentos con cómo resultaron estos, y como siempre nos encantaría ver lo que logras con tus propios insertos Stanley FatMax Prostack. Para compartir o ver lo que otros han hecho, visita nuestro Instagram and Comunidad de Facebook ¡y déjate inspirar!












 Kit de corte gratuito en pedidos válidos
 Más de 3.000 críticas positivas
 Más de 500 vídeos en YouTube
 Asistencia en el Reino Unido