Cierre de pedidos diario a las 2 p.m.

Capas que ahorran espacio para aprovechar al máximo tu almacenamiento
Si hay algo de lo que muchos de nosotros somos culpables, es de no maximizar el espacio. ¿Cuántos de nosotros tenemos cajas o contenedores que tienen todo el contenido amontonado en el fondo? ¿Luego, inevitablemente, un montón de espacio extra y sin usar en la parte superior? Una pregunta que nos hacen aquí todo el tiempo es: "¿cómo puedo aprovechar al máximo el espacio en mis cajas?". Hay muchos trucos de almacenamiento e ideas para ahorrar espacio que tanto nosotros como nuestros clientes hemos ideado a lo largo de los años. Así que aquí hay algunos consejos para ayudarte en el camino.
Ahora nos referiremos a todo tipo de cajas de herramientas el proceso de esto. Pero esencialmente puedes aplicar esto a absolutamente cualquier caja en la que quieras almacenar cosas. Ya sea para beauty, pesca, almacenamiento en casa, photography, viajar, tech, juegos…. lo que sea que necesites organizar.
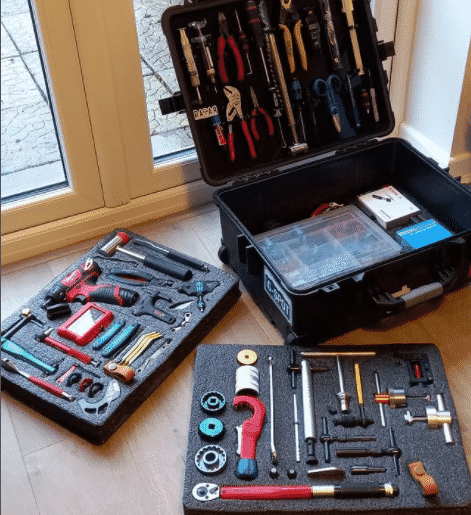
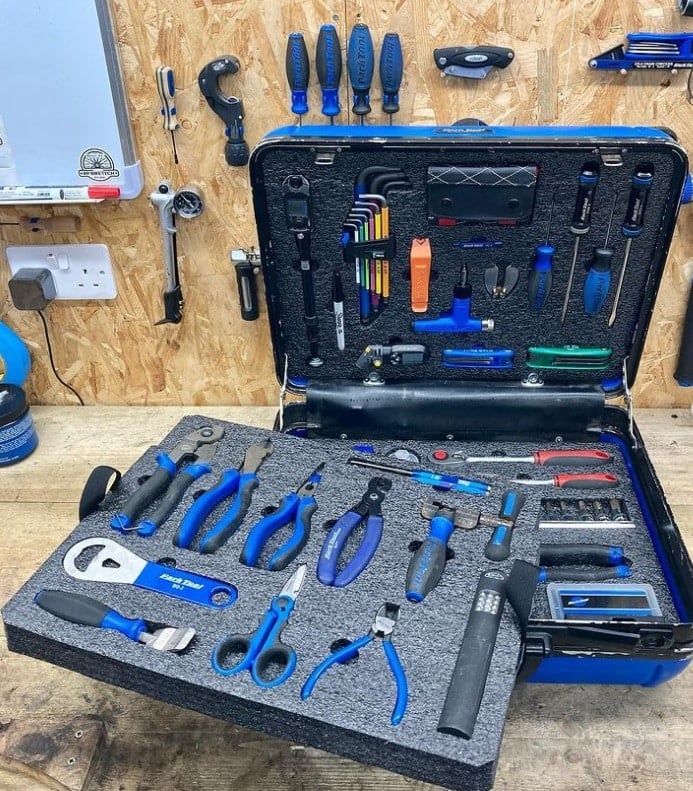
Usar Shadow Foam como una bandeja removible
“¡Pero es solo espuma!” ¡te oímos decir! Está bien, ten paciencia con nosotros en esto. Nuestra espuma es en realidad bastante resistente. Por supuesto, depende de la profundidad y de lo que estés guardando allí. Pero a menudo soportará fácilmente ser retirada y reemplazada en tu caja perfectamente.
Pero, si estás almacenando artículos más pesados y quieres facilitar el acceso, aquí hay algunos consejos y trucos que hemos aprendido y escuchado a lo largo de los años. Así es como realmente puedes aprovechar al máximo tu espacio.
- Utiliza diferentes profundidades de espuma. Digamos que estás almacenando herramientas, algunas son más grandes, otras más pequeñas. Podrías usar una capa más delgada de espuma para las herramientas de mano más pequeñas, por ejemplo. Luego, tal vez, agregar una capa más gruesa para las más grandes. Shadow Foam viene en 30mm, 50mm y 70mm profundidades para permitirte hacer esto más fácilmente. Por supuesto, capas más pequeñas significan que puedes ajustar más capas.
- Posicionamiento. Si hay artículos que usas con más frecuencia, asegúrate de que estén en la parte superior o en las capas más altas. Los artículos que se usan con menos frecuencia pueden almacenarse abajo, donde no quieres acceder a ellos tan a menudo.
- Eliminación. Nuestros insertos hechos a medida para cajas de herramientas tienen un ajuste bastante ceñido. Así que puede que desee considerar una forma de sacarlos más fácilmente. Quizás añadir tiradores para los dedos, o alguna forma de asa para facilitar su entrada y salida de la caja.
- Peso. Si tienes artículos más pesados allí y la espuma comienza a ceder o doblarse cuando intentas quitarla, probablemente debas pensar en usar algo en la parte trasera para mantenerlo firme. Normalmente usamos correx ya que es ligero y barato. Pero igualmente hemos visto cartón prensado, aluminio e incluso fibra de carbono ¡utilizado para este propósito!

¿Qué pasa con los mangos?
Todo depende de la preferencia personal... a veces los añadimos, a veces no. En cuanto a qué usar para esto, hay muchas opciones, así que ve cuál te conviene más.
-
Mangos de cordón retorcido – has visto este tipo de cosas en bolsas de regalo y similares. Simplemente podrías hacer pequeños agujeros con un taladro en el lado del inserto y luego pasar estos a través.
Igualmente podrías usar cordones de zapatos anudados lugar de estos. Solo ten en cuenta que si es demasiado grande, el nudo podría evitar que el inserto se asiente plano en el fondo.

- Mangos de cordón de punto – Echa un vistazo a continuación a nuestro propio famoso Cajón de Whisky truco de almacenamiento. Usamos un cordón plano fuerte y lo pasamos a lo largo de la parte posterior del correx inverso para darle a este gran y bastante pesado inserto el máximo soporte. Varios años después, ¡sigue en pie!

Ya tengo las bandejas de plástico que vinieron con mi caja.
¡Bueno, eso es genial! Y si están aguantando y te permiten estar tan organizado como quieras con ellos, eso es perfecto. Por favor, continúa aprovechándolos al máximo. Odiamos el desperdicio, así que mientras funcione para ti, eso es lo principal. Sin embargo... la mayoría de las veces, las bandejas que vienen como estándar con las cajas están diseñadas con una longevidad limitada. Normalmente, solo están ahí para ventas, exhibición o propósitos de transporte, realmente son más un embalaje a corto plazo. Por esa razón, no están diseñadas ni construidas para durar.
Igualmente, no están diseñados pensando en ti y en lo que necesitas. Bandejas genéricas y preformadas que no se adaptan al 100% a ti pueden ocupar mucho espacio utilizable.
Lo que puedes lograr al reemplazar las bandejas estándar del fabricante
Echa un vistazo a la Desafío Bosch lo hicimos hace un tiempo donde logramos quitar las bandejas estándar y reemplazarlas con Shadow Foam. Esto las hizo más adecuadas para su propósito, más duraderas y mucho más organizadas.
De manera similar, si estás buscando almacenar tus herramientas eléctricas mientras maximizas el espacio, echa un vistazo a esto Dewalt TSTAK transformación. En ella te mostramos cuánto equipo adicional puedes organizar, llevar y proteger con un mínimo de tiempo y gasto. Todo lo que hicimos fue quitar el insert de espuma de poliuretano endeble que viene con la funda como estándar. La espuma de poliuretano no es reciclable. Y esta es la razón por la que fue eliminado de nuestra propia línea de productos hace algún tiempo. Al reemplazarlo con dos capas de Shadow Foam pudimos meter más equipo allí y hacerlo mucho más práctico para el uso de su propietario.
¡No tengo espacio para Shadow Foam!
Hemos oído esto antes, pero en la práctica, generalmente es todo lo contrario. Es justo decir que a menudo parece haber algún nivel de prestigio asociado a tener una bolsa de herramientas desbordante y desorganizada. Pero, de hecho, ¿no preferirías tener menos herramientas perdidas o dañadas? ¿Y ahorrar el tiempo perdido buscando cosas al poder agarrar lo correcto a la primera, cada vez? ¿Todo esto mientras impresionas a cualquier colega, jefe o cliente que se encuentre con tu equipo?
Cuando busques ideas para ahorrar espacio, considera la adición de una herramienta de organización como Shadow Foam. Al organizar y facilitar el acceso a todo, a menudo descubrirás que en realidad puedes acomodar más artículos allí que antes.

Piensa en "eso" tarro de café analogía (hermosamente ilustrada aquí en este cortometraje por Héroes de Litmos). Si no lo sabes, las piedras grandes van primero en un frasco, piensas que está lleno pero luego las piezas más pequeñas encajan a su alrededor... y así sucesivamente. Esta analogía se utiliza con mayor frecuencia para demostrar la eficiencia del tiempo, lo cual es muy apropiado aquí también. Pero además, demuestra perfectamente cómo, cuando tus artículos más grandes o voluminosos están organizados, habrá más espacio para que las piezas más pequeñas se ajusten a su alrededor.
Planificar y utilizar un proceso eficiente sobre cómo y dónde se almacenan las cosas es una verdadera estrategia ganadora. No solo encajarás más allí, sino que también ganarás en términos de tiempo. Encontrar lo correcto, a la primera, te ahorrará tantas horas acumulativamente a largo plazo, ¡el máximo en trucos de almacenamiento! Luego, considera nunca perder cosas porque ahora es obvio si falta algo, y estarás en el camino del éxito.
¿Por qué el control de herramientas?
No es casualidad que industrias como la aviación, la ingeniería y la mecánica deportiva tengan control de herramientas obligatorio, es porque realmente mejora la eficiencia y la responsabilidad, ¡así que por qué no deberíamos poder aplicar esto a cualquier área de nuestras vidas! Los trucos de almacenamiento y las ideas y soluciones para ahorrar espacio están ahí para hacer la vida más fácil, mejor. Así que en realidad, generalmente, sí. Realmente deberías tener espacio para agregar Shadow Foam para ayudar a organizar tus contenidos. ¡Y algo más!

¿Quieres ver si Shadow Foam puede funcionar para ti?
Entonces inténtalo... puedes obtener un sample de nosotros generalmente al siguiente día hábil. También deberías explorar algunas de las ideas y usos que demostramos en nuestro Canal de Youtube . ¡Eso realmente te ayudará a inspirarte! Cuando estés listo para intentarlo, asegúrate de estar completamente equipado con lo correcto equipo de seguridad. Luego, mejora tus habilidades de corte y pelado viendo nuestro “cómo hacer” videos y ¡allá vas…! Como siempre, asegúrate de compartir tus trucos de almacenamiento, ideas para ahorrar espacio y creaciones con nosotros en nuestras plataformas sociales también, ¡nos encanta verlas!


 Kit de corte gratuito en pedidos válidos
 Más de 3.000 críticas positivas
 Más de 500 vídeos en YouTube
 Asistencia en el Reino Unido